Unknown's avatar

About Mominthegarden

I'm an American enjoying life in Ireland. I live in the country with my family. It is so beautiful here! I've been creating our garden from "scratch" and having fun doing it! I blog about my gardening adventures, and a bit about Ireland, too.

“Me time” to crochet a Rainbow Poncho

fingers with red nailpolish, rainbow colored yarn

Having some “free time” = “me time”!

Hi there! We were away at my daughter’s Irish dancing competition last weekend, which meant I had lots of “free time” before and after her competitions. Now that my daughter is 14 and does all of her prep work herself, the free time was really all mine (and better for my daughter’s stress levels when I keep myself busy!). I took full advantage of that time and started a new crochet project.

the first three colors of a poncho

In the beginning… starting at the neck.

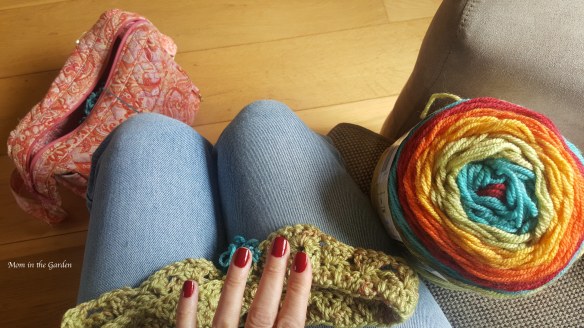
This project was actually a long time in the making. The yarn, called “Caron Cakes” in the color palette Rainbow Sprinkles, was bought for me by my husband about two years ago when he was in the U.S.A. on a business trip (isn’t that nice?!). He thought I’d like the colors, which was 100% correct as I LOVE the colors!

Caron Cakes yarn in Rainbow sprinkles color with start of poncho

watching the colors unfold

My problem was that I didn’t know what to make with these colors, and I only had two skeins (balls) of yarn. A poncho seemed the best choice, and I began my Pinterest search of patterns. Lots and Lots and Lots of patterns!

cat on lap with crochet poncho in progress

Kitty was convinced I needed her support while crocheting.

Eventually, I found the poncho which I thought would be perfect.  The pattern I finally picked is called Mountain Breeze Poncho and was designed by Lorene Eppolite.  It is a free pattern (I love those)! I would still consider myself a novice when it comes to reading patterns, so it took me a few go’s to get it right in the beginning.  But once I figured it out, it was rather easy.

rainbow poncho half finished

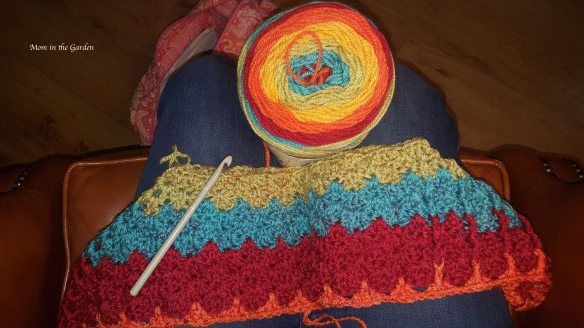
Mid-way progress picture!

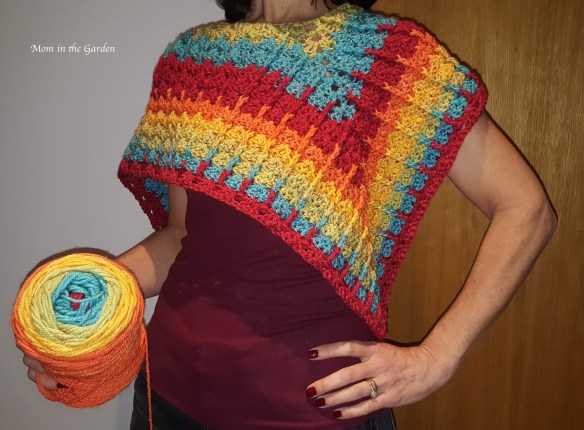
It is meant to sit slightly off of the shoulders, which seems a bit unusual, but I think it works well.  The front “pointy” part and the back “pointy” part are actually different. The front has a pattern of raised lines, whereas the back does not.  A bit quirky. 🙂

the back of the poncho half completed

Here is a look at the back while still in progress.

The yarn is soft and I enjoyed working with it, and the poncho itself has a lovely feel. I used a 7 mm crochet hook which is HUGE compared to what I usually use. That took some getting used to! I’m not able to whip through projects, as my hands tend to cramp up (I hold the yarn too tightly!). But this poncho came together quite quickly.

completed rainbow poncho

The finished Mountain Breeze poncho in Caron Cakes ‘rainbow sprinkles’

I fiddled a bit with the neck. The pattern had a more open neck, and I preferred a more closed neck. I won. 🙂

back view of completed rainbow poncho

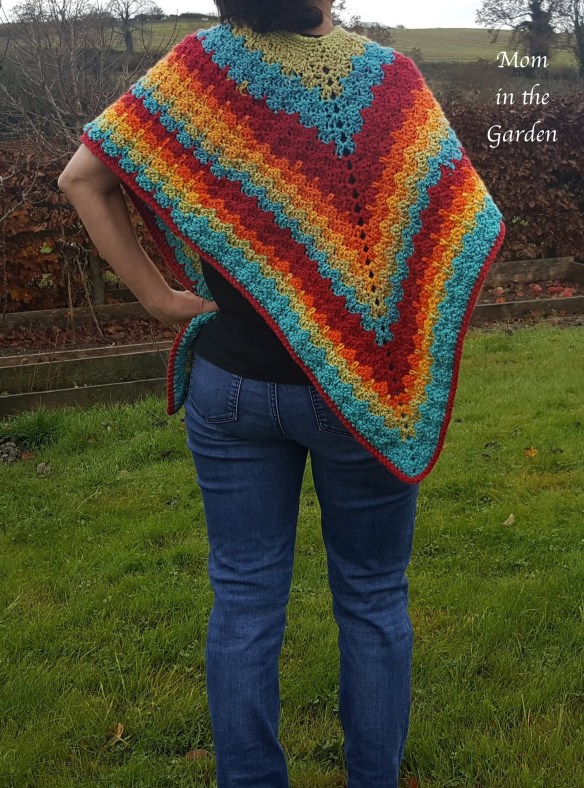
A back view of the completed poncho.

I also added on a bit to the outside edging, as I wanted a more defined look. I think I can still wear it with the raised line pattern a bit more on my shoulder, I’ll have to play around with that look!

completed rainbow poncho

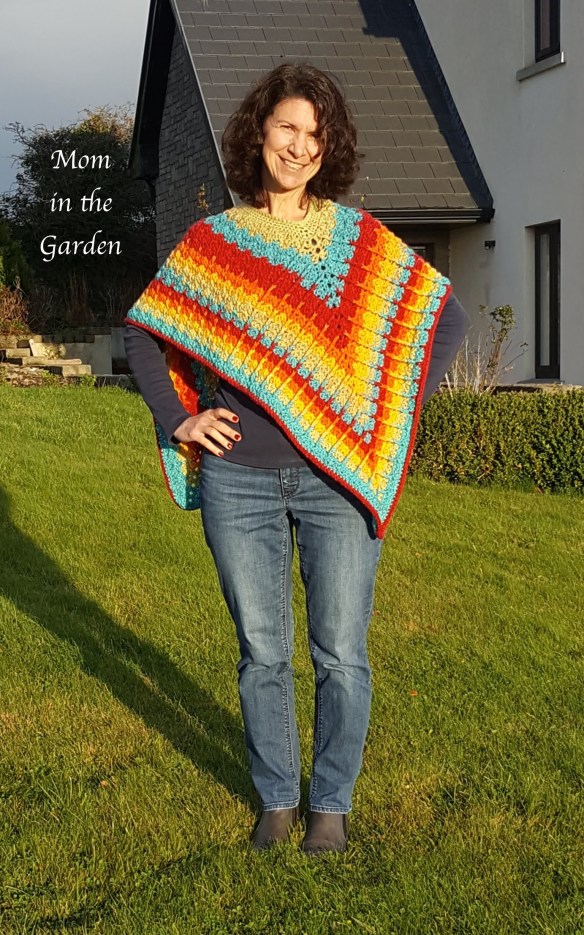
Completed Mountain Breeze Poncho in Caron Cakes ‘Rainbow Sprinkles’

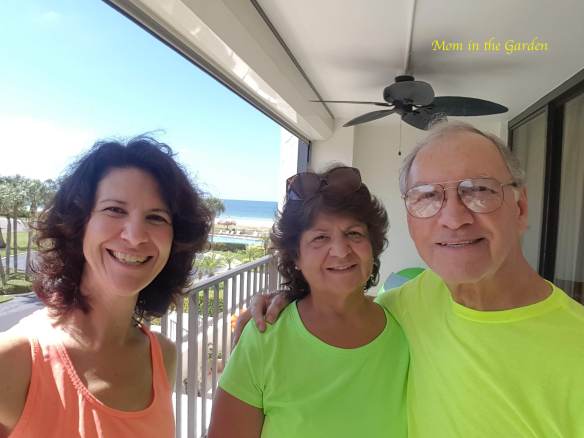
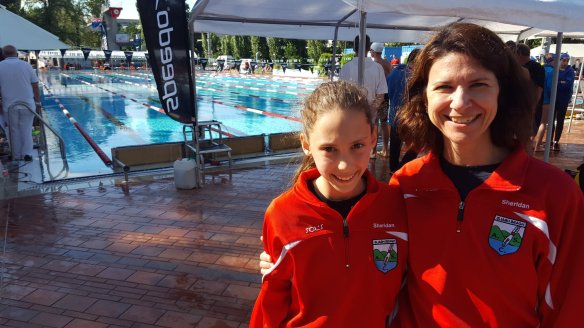
I loved that this was a quick and relatively easy project, and that I was able to use these fabulous colors! Back to last weekend’s dancing: My daughter danced beautifully at her competition. It was a big competition, and she didn’t place as well as she’d hoped, which is tough. But she’s resilient, and is determined to work harder.

mom in the garden with her daughter in Irish dancing dress

My daughter and I at her Irish dancing competition

There is a funny story that happened over that weekend when we were away for the dancing. A woman who was sitting next to me, looked at me and my crocheting and said “You don’t like free time, do you?”! I laughed and replied that this was my free time and I loved it! I guess it all depends on your perspective.

What do you do in your “me time”?

In peace,
Dana


mom in the garden kneeling at flowerbombed pipe in the garden wearing rainbow poncho

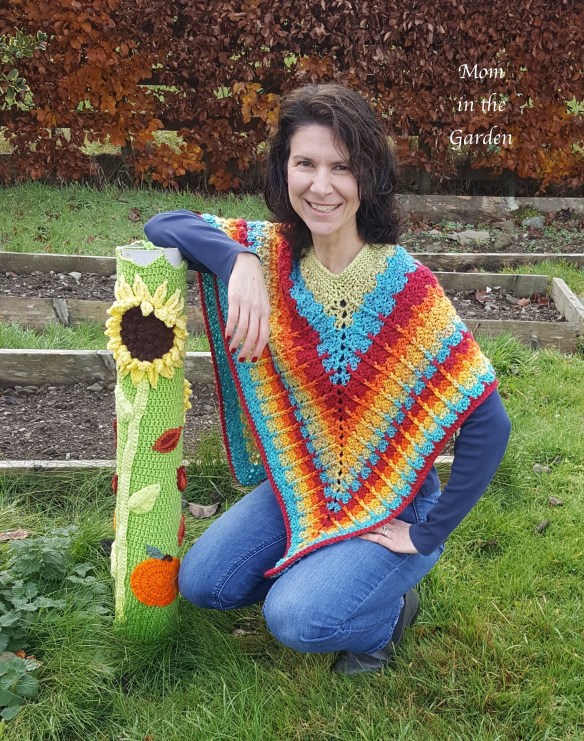
And this is me, kneeling at my yarnbombed (sewer) pipe in the garden. I just like adding a bit of color to life!


Garlic wins as Easiest, most Rewarding item to plant in the garden!

playhouse with geraniums

In 2014 I had geraniums around the playhouse. Today, I have lavender, roses and bleeding hearts because I find perennials easier than annuals.

Hi there! This post is about conveying that gardening doesn’t have to be an “all or nothing” past-time. We started out spending quite a bit of time in the garden (read: Every.Spare.Minute.). But as our family is growing-up, and our interests are growing (can you say that?), we are spending less time in the garden. Given how precious time is, it is important that we only grow what we have time to care for. That means that we grow what is easy!  And the top of that “easy to grow” list is garlic.

freshly harvested (Cristo) garlic

Freshly harvested organic Cristo garlic (from last summer)

I am still a stickler about not using chemicals in the garden, and I source organic seeds/plants. Fruit Hill Farm, based in Cork, has been a great resource for organic growing, and I’ve been quite happy with the garlic which they have provided. I’ve only used two varieties: Cristo and Vallelado. I like garlic that is planted in the fall and harvested in the summer. It is nice to have some growth in the garden over the winter, and it requires very little maintenance. The rewards are huge, as the taste of home grown garlic is far superior to store-bought garlic, if I do say so myself. 🙂

organic Vallelado Garlic label

Fruit Hill Farm, based in Cork, is where I buy my organic seeds and plants.

“Winter garlic” can be planted any time in the fall. The rule of thumb is to get your cloves in the ground before Christmas, to ensure (in Ireland) that they get enough time in soil that is cold enough. My husband enlisted the help of our youngest daughter to assist with planting. We’re using different beds for the garlic this year,  and since I had cleared the two beds of weeds following our pumpkin harvest a while back, they could set to work straight away.

bowl of garlic cloves on cleared planting bed

a bowl of organic garlic cloves and a prepared bed

My husband made the holes in the soil and my daughter placed in the cloves (pointy side up). It is nice to get the kids involved. (I hope they think so too!)

soil with holes for planting

not too difficult… although I hope they turned that clove pointy side up!

If you’d like more step-by-step instructions, you can click here to my earlier post about how easy it is to grow garlic. We planted Vallelado this year.  It is good for storing, which I can attest to. After harvesting and drying out in the summer, I keep mine in a paper bag in a closet in our (somewhat cold) utility room. It will last all winter long, and you will have plenty to give away to friends, too.

freshly planted garlic beds

Two freshly planted garlic beds.

garlic and geranium sitting on wall

a throwback to 2013 🙂

Sometimes, I can get all caught up in life in a too serious kind of way. This is never a good idea! There is something to be said about getting older and wiser, though. Thankfully, I do find myself recognizing when I’m getting a bit too serious, and I can work on changing gears. A lot of this has to do with balance, or being out of balance. You know: work/family/house/garden/…me! 🙂 And that is why we only plant the easy stuff in the garden!

wreath made with garlic, dried artichokes and dried roses

Garlic wreath with artichokes and roses

And if I find myself getting too serious, I go and make a wreath with anything and everything I can gather from the garden!!! Because inevitably, that puts a smile on my face.

Will you join me in planting garlic this fall? There are still a few more weeks left to do so!

In peace,
Dana

Reduce, Reuse, Recycle

fall garden with ornamental grass, aster, pumpkins, sunflowers and playhouse

Our garden in 2017 with sunflowers, pumpkins, aster, ornamental grass, but no rain catcher / water butt / water barrel

Hi there! This post is about how I wanted to “Reduce, Reuse, Recycle” in the garden and how my family helped to make that happen. It all started, really, with what I saw was a “need”. Even though Ireland typically gets a lot of rain, there are many times when plants in the garden need watering. I would prefer to use “caught” rain water, since it does rain so much. Also, we don’t have an outside faucet (tap) and I have plants all over the garden. This means that when the plants need watering, I have to fill watering cans from our utility room and walk around the yard. It would just be nice to have water “stations” around the place. If you’re gonna dream, might as well dream big!

rain catcher - water butt

Our first rain catcher / water butt

More than a few years ago we purchased a water butt (or rain catcher / water barrel) and placed it at the back of the house. I wrote a post about it here. It is pretty, but it was expensive, and I’m always looking for more water after I’ve emptied it. I didn’t really want to spend a lot of money on another one. So, last year for my Christmas gift, I asked my son and husband to come up with an economical solution, that would still look ok. 🙂

in-progress assembling Water butt

My son and husband in the planning stage of setting up the water butt on a very mild day in December 2017

I requested that the location for the water butt be on the side of our playhouse. They were fairly creative and spoke with my sister-in-law’s husband, who is a dairy farmer, to see if he had any containers which might be recyclable. Lo and behold, he did have containers available that could be converted and used to catch rainwater. (I double checked, there weren’t any chemicals used in them!) My son and husband measured the roof of the playhouse, and bought the piping. Then they set about in assembling my water butt / rain catcher / water barrel.

water butt and hose attached to playhouse

A view of the water butt all assembled (please do ignore the terrible state of the roof … that is on the never ending “to do” list)

Thankfully, it wasn’t too much work for them and they had it set-up in no time. They inserted a faucet (tap) at the bottom of the water butt. This makes it nice and easy for me to access the water and fill the watering cans. I usually try and hide the hose, and hose extension behind the playhouse, because that bright green really stands out (in a bad way!) in pictures.

side view of playhouse with water butt

Side view of the playhouse with the water butt in sight

My daughter did a great job with giving the playhouse a couple of coats of red paint this summer, which really looks nice … despite the desperate state of the white trim and roof (says she who always seems to have more things on the “to do” list than there is time or volunteers to do them!).

fall view of garden with ornamental grass, aster, playhouse and water butt

Fall view of the garden in 2018, including the water butt

I have to say that I was so pleased with this Christmas gift last year. We managed to recycle the water butt container, we now get to reuse rain water, and there is another water station in the garden! Win – Win for everyone! There are plans to set-up another water butt on the other side of the yard (and if it doesn’t happen soon, it will be this year’s Christmas request!).

Thanks for stopping by.  I hope that I’ve inspired you to Reduce, Reuse, Recycle in some way or another!

In peace,
Dana

gladiolus flower and roses

These gladiolus, the Dark Knights, and David Austin roses, Teasing Georgia, have already benefitted from our “new” water butt

Showing up to enjoy the party! (a.k.a. being Present)

Life is full. Our family schedule, although much lighter now than just a few years ago, is still the max we can handle. We are busy! Sometimes it is easy to get lost in the schedule and the busyness and just go through the motions. Really easy. “Wait, how did I get here?!” Ever have that thought? I have. I don’t want to just go through the motions, though, because then I don’t get to “enjoy the party”!

O.K. stretching on this one – a picture to represent enjoying the party?! Lots of parties have cake, right? We can make this work…

As I’ve gotten older, I’ve gotten much better at recognizing when I am present and when I am not being present. There are certainly times when I’m not being present, but I think that for the most part I am pretty good about being present. Yes, even when doing the dishes. 🙂

I think I’ve been really lucky. I enjoy where I live, the work I do, my hobbies, so many things! When I’m doing things I like to do, I find it much easier to be present. I was in Chicago last week for work. I loved every minute of it: listening, smelling, tasting, everything American! I really enjoyed meeting people and hearing where they were from and what they do.

All smiles in Chicago!

My hotel was a short walk from the conference hotel. On one of the days, I recognized that I was smiling with a silly grin on my face as I walked down the street, with the sun shining brightly and causing me to sweat more than I would have liked! But it was such a perfect moment, in Chicago, in the sun, on my walk, with a silly grin.

At the conference, all of the participants received a copy of Amy Cuddy’s newest book called Presence: Bringing your Boldest Self to the Biggest Challenges. What perfect timing for me! Although many people have different interpretations of what presence means, I needed a little tap on the shoulder to help me with this one on a professional level. Sometimes I’ve found it difficult to “bring my boldest self” to the table. For me personally, my take-away from this highly recommended book, is to believe in yourself, be prepared, and after that you have to be relaxed (that is the hardest part for me!). When I think of new challenges that have gone well, these elements have been key.

An excellent read! I highly recommend this book.

After the conference, I had the opportunity to visit my parents. I hadn’t seen them in too long. I wanted to go and visit them and just spend time with them. I didn’t want to do anything in particular, which honestly, isn’t like me. Normally, I’d have a list of things I’d want to see or do. I think because of this relaxed state of just being with them, it was a really nice visit. In fact, it was a perfect visit.  (And my Mom made some of my favorite foods!)

Linguine with clams, shrimp, garlic, broccoli, and (shhh, don’t tell anyone, lots of butter). One of my favorite “nobody cooks like Mom” dinners!

We’re from upstate New York, and for too many years my parents dealt with harsh winters with too many snow storms and terrible weather. They are enjoying their well deserved break from all of that in their new location in Florida. They have created a lovely home there, and thoroughly enjoy the good weather. They swim, exercise, and walk on the beach as part of their daily routines, and they love it!

An Egret on the beach, just hanging out and enjoying the nice weather!

I found the beach to be so relaxing. There were so many different varieties of birds, and some of them were quite entertaining to me! I took way too many videos, to my parents’ amusement. Oh and the shells! So many beautiful shells! My mom and I enjoyed walking the beach for hours and collecting shells. I wonder what craft project I’ll make with them? 🙂

A small selection of the shells we collected.

And just like that, it was time to return home. Time to say goodbye to the warm weather, and my parents, and the time away from my typical daily routine. And just like that, I was home, and oh so happy to once again be home.  Because, quite honestly, I am enjoying the party.

My father, especially, loves wearing florescent colors! So we had to take a picture of all of us in our bright colors!

Are you enjoying your party? I hope so! 🙂

In peace,
Dana

My parents have some lovely flowers on their balcony. This hibiscus was my favorite!


It all comes down to Personality!

Morning sunshine gives a warm hue to the hydrangea wreath

Everything we do, and how we choose to do what we do, comes down to our individual personalities. For me, my personality is such that I like to find second uses for things. I don’t like to waste, or get rid of something if it can possibly have a second life. What better way to give a second life to flowers than arranging them in a wreath or a floral arrangement? None, I say! 🙂

This is how I dry my flowers 🙂

Hydrangea are great for drying. It is best to use “mature” blooms, which have a more substantial (papery) feel to them. If they aren’t mature, then the leaves tend to curl. There isn’t anything wrong with curled leaves, I just don’t think they are quite as pretty (although my wreath has some of them, too!)

It all starts with a straw wreath frame and some floral “u” pins.

Wreaths are so easy to make!  In my book, it is essential to have a straw wreath frame, floral “u” pins, and some Spanish moss.  Anything goes for the rest! My hydrangea didn’t flourish this year, due to the drought this summer I presume. So I did get some lovely deep cherry colored blooms from a friend. I traded her zucchini bread for hydrangea blooms, that’s fair isn’t it?

These green colored blooms are hydrangea Incrediball.

I have all of my colors on the table, or hanging on my Flower Tree, and I just dive in.  The hydrangea paniculata ‘Vanille Fraise’ had very small, beautiful blooms this year, but their stems weren’t very strong and most of them broke while pinning them. That was a bummer, as they were really pretty!

Piece by piece the wreath comes together.

I made this one night after work this week. I felt the need to create something! Since I don’t have anything on my crochet hooks, it had to be with dried flowers. I still have loads of lavender around my house, too! (See what I did with that further down the post.) I really enjoy working with my hands, and I’m glad to have such beautiful materials around me to create with.

Ta-dah! This is where my wreath will reside in our kitchen.

Purple, cherry, green, blue, pink: it’s all in there.

Inside lighting doesn’t give the exact coloring.

Nothing beats natural lighting, but then of course there is morning sunshine and evening sunlight, both of which slightly change the coloring again!  You can see for yourself in the following photos.

Bright daylight, but no direct sunlight: This coloring is probably the closest to reality!

This picture has the tiny pink hydrangea paniculata Vanille Fraise.

The dried hyrdrangea is mostly hardy to work with. The green stems are actually doubled-up stems that I have smushed together after taking off brown markings on them. You can really do anything with them (as long as their stems are strong!).

My go-to photo place for wreaths is our playhouse door! This is just for photos as I wouldn’t leave this outside…

Morning sunshine gives a warm hue to the hydrangea wreath

Like I mentioned, I still have loads of lavender “drying” around the house (that I really need to put away!).  I decided to create a simple arrangement, using a magenta colored vase which happens to perfectly match some of my dried roses.  Yes, these little things just get me all excited! First of all, I was able to use a lot of lavender to fill this vase, and secondly, that magenta color is *gorgeous*!

Dried Lavender + Roses = beauty

magenta colored roses and vase

And here is where they will live:

Home sweet home for my vase of lavender + roses.

It’s the little things! I’m glad to give a second life to my flowers, and the lavender and roses really do have a beautiful fragrance.  This is me, this is who I am, and this is my personality.  🙂

What’s your personality like?

In peace,
Dana

Our playhouse in the morning sunlight.

September’s beauty is tempered only by the gardening to-do list…

We are still enjoying warm weather, not quite ready for the chilly days of fall just yet …

September can be such a beautiful month. Although the temperatures tend to dip slightly in August, inevitably, when the kids head back to school in September, the weather turns warm again! We have been lucky to enjoy rather mild weather of late. The garden, having been quite patient all summer while I left it to its own devices, is now demanding that I pay her some attention. I love working in the garden, don’t get me wrong. We were just busy with life!  So little by little, we’ve managed to extend some time and effort to get (some) things done in the garden.

If I could draw your attention to the green leaves along the edge of the railroad ties, those are Bergenia, a deep pink flowering variety, which have spread a bit more than I’d like.

Bergenia flowering in May

These Incrediball hydrangea were a lovely white in August, but turned a rusty brown quite quickly, unfortunately. The Bergenia, on the other hand, have done really well! This was the clump (on the left) before we separated them.

One of the items on our “to-do” list was dividing up plants. I think it is pretty safe to say that Bergenia plants, also known as elephant’s ears due to the foliage, are extremely hardy! These guys are so happy in my garden, and they have just flourished (read: multiplied exponentially!). I wanted to remove a few to prevent them from clumping too much. But before I knew it, my husband had dug them all up! So we’ve spread them out, and moved them around the yard.

The Bergenia plants needed to be separated as they had clumped together.

A little more breathing room after we divided the Bergenia plants (my rusty looking Incrediball hydrangea plant in the background)

Staying in this same bed, my Iris ‘Benton Storrington’ are also quite happy here. My original purchase of two plants has yielded more than a few!

I originally bought two plants and now I have, well, LOTS!

I actually had to move them because they were spreading into one of my hydrangea plants. I’ve simply moved them to the other side of the same bed (hey, if they are happy here, I don’t want to rock the boat!). But first I untangled their roots to separate them. That worked with most of them, while a couple of them had to be cut apart. There was quite a clump!

quite a tangle of roots! This is why you have to separate them!

I forgot to remind my husband that the rhizomes, in order to get exposure to the sun, need to be at the surface, and not buried in the soil. So when I noticed his mistake after he’d planted a few, there was a teeny tiny moment where he just stopped and looked at me, shook his head, and then proceeded to re-plant them, correctly this time. Good thing he’d only done a few! 🙂

A row of freshly planted Iris, and in front of them are freshly planted Bergenia plants.

Iris Benton Storrington – which you can see is growing into the hydrangea!

Iris Benton Storrington

There was one more plant which we divided, another Iris actually, although this time not a bearded variety (so no rhizomes to keep at the surface!). I don’t have any pictures of what the area looks like now. But, here is a picture from before we moved any, when they were in bloom. The perspective is “higher” as I was actually leaning out of my bedroom window (being very careful though!). 🙂

non-bearded Iris

Lots of Iris and Lilacs!

They are very pretty, and apparently they, too, are very happy as they have spread like crazy! My idea was to separate them and spread them about the yard. But for now, we’ve taken one clump out of the mess and moved it further down the bed, and we moved another clump to the “Center Garden”.

our “Center Garden” is expanded again with the addition of Iris on the right

I am really happy with how our Center Garden is taking shape. I wasn’t sure if I should add anything else to it, but I think the Iris will be really pretty.

Pears, Apples and Sunflowers from our garden

My gardening takes lots of patience while I figure out how to get it just right, and watching as things mature and fill in spaces and provide structure. I LOVE this process! It is so neat to watch the garden throughout the entire year as it changes from one season to the next. I am constantly thinking of “what’s next” in the garden. I have a list in my head of all of the plants I want to add, and changes and additions to the garden. But right now, I am completely happy with exactly how it is, weeds and all! As for the gardening “to-do” list, let’s just say that I am happy that we are making progress!

In peace,
Dana

Good Enough

My veggie / fruit section of the garden

I haven’t written about the garden in a while. I’ve been beating myself up that it isn’t good enough to photograph, or talk about, or inspire.  Not.Good.Enough.  What??? Over the past eight years I’ve created a garden that brings me right to my happy place. How can that not be good enough? Admittedly, five years ago, this same patch of garden looked somewhat different, and perhaps more inspiring:

Purple Brussels sprouts, pumpkins, and squash in my 2013 garden

In fact, when I visited that blog post recently, the garden blew me away! Seriously, have a look. That did NOT help my feelings of inadequacy for my current garden! But so much has changed since then. The biggest change was that four years ago I went back to work after being a stay-at-home mom for 16 years. 16 years! Wow! I was lucky. I loved it. And now I am glad to be back working (outside the home) too… except that means a lot less time for taking care of the garden. It means that my view of what is Good Enough has had to change. And today I am stopping myself from saying it isn’t good enough, to saying it most certainly is Good Enough!

a cluster of our pears – almost ready for picking

our pear tree with a few handfuls of pears

I will focus on the good stuff: Our fruit trees.  We have one pear tree, one “eating apple” tree, and one “cooking apple” tree (Arthur Turner), and they are all filled with fruit this year! I must give credit to my husband for tidying up the base of our trees.  Ideally, the clearing should match the width of the branches, so every year as the tree grows, the clearing should be widened. It had been a few years since this task was done, so it was a big job this year. After all of his digging, he then worked a lot of our compost into the soil.  I think the trees look neat and tidy, and rather pretty if I do say so myself! (although perhaps slightly tilted?!)

funny, my husband doesn’t think this tree is leaning ever so slightly …

Fabulous combination of pretty and delicious!

I don’t have a variety name for the eating apples. They are sweet, and delicious tasting.  The cooking apple variety, Arthur Turner, are not sweet, and definitely need sugar when used. They are usually a greenish yellow color, but this year they have a pink hue.

do you also see the slight tilt on this tree too???

a pink hue to our Arthur Turner cooking apples

This year I planted pumpkins, squash, and sunflowers. As surprising as it is to hear, Ireland experienced a drought this summer. So some things in the garden didn’t quite thrive.  My sunflowers bloomed very early and died very quickly!  I cut off a few large heads, and have dried them to use the seeds next year. The rest are still in the garden for the birds to enjoy.

My daughter was helping me take pictures of my lavender wreath (which is in her hand) when I took this picture of the sunflowers. Kitty also enjoys being in pictures, just not posing for them… Off to the right you can see my leaning gladiolus The Dark Knights. I sense a leaning theme.

A bird eating the seeds from a sunflower

It is worth leaving the dying flowers for the birds to feast on the seeds, even though the plants look unsightly!  I love seeing the birds in the garden. It is worth having the dead plants there just for them 🙂

a common Blue tit sitting on one of my sunflowers

this is what the flower head looks like when you leave it in the garden for the birds to eat – lots of seeds missing!

The pumpkins also had an unusual growing situation this summer. Similar to the sunflowers, they ripened much quicker than usual.  Honestly, it is usually around Thanksgiving time (November) when mine finally turn orange!  This year they turned orange in August…

Four pumpkins completely orange in August…

They have provided a lovely splash of color in the garden, along with the summer squash.  (I stopped picking the squash many weeks ago, but they still provide beautiful color!)

nearly ripe pumpkin … in August!

There are two more pumpkins in the garden, but they have chosen to grow and ripen at the normal rate for us albeit in an unusual place:

this pumpkin is growing in ornamental grass (this was not planted by me!) and will hopefully turn orange right around Halloween 🙂

I tend to be rather hard on myself. When I stop and pay attention, I do of course appreciate that I have worked quite hard to create my happy space of a garden.  “Good Enough” was never an expression I would have accepted years ago.  But now I know that it is much more important to appreciate what is in front of me.  I might need reminders of that every now and again, but I do now accept that Good Enough is Perfect!

I hope you have enjoyed the views in my Good Enough garden!

In peace,
Dana

There were only a few gladiolus stems this year (due to the drought) but they were still pretty!


Wreath making in the height of Lavender Season

One of my lavender plants (lavandula angustifolia) nestled between Pittosporum Tom Thumb and Hydrangea Incrediball

I have quite a few lavender (Lavandula angustifolia) plants . They thrive in my yard, and I am quite happy about that! About mid-July, depending on the weather, I start to “harvest” the lavender. I cut it as it just starts to bloom, cutting about 2/3 of the stem (or a bit more). Then, this is the fun part, I lay it on the floor around my house; in my sitting room, in my bedroom, in any free space that I can find, because it is a lot of lavender! I try and lay it flat, to help it to dry out as quickly as possible. A couple of weeks usually does the trick (as long as it isn’t wet when I cut it). Thankfully, we don’t really use the sitting room, so at least it isn’t a problem to use the entire floor of that room!

This one is my favorite lavender plant (Lavandula angustifolia) in bloom

There are a few things I do with the lavender. If I have time when I cut it, I will make lavender wands (the stems must be fresh though, so they don’t break while bending). I also make lavender sachets, which involves taking the lavender off of the stems after they are dried, and then sewing up little pouches. You can click here to read and see more about wands and sachets. But my favorite craft to do with lavender is to make wreaths.

I took apart one of last year’s lavender wreaths. Here’s what came off of it! (Lavender, Rosemary, Roses, Spanish moss)

It is a time when I can be creative, work with my hands and just have fun.  I love it! Depending on the wreath, it takes about two hours to make, give or take. Aside from the plant materials, the main items which I use are: floral straw wreath form, floral “u” pins, and secateurs. I try and use some kind of different plant material every year, and this year I used poppy seed pods, and an artichoke. I made three different wreaths, each a bit different. Here’s a look at what I did!

This is how it begins: a bunch of lavender, and a wreath form!

I start with grabbing a bunch of dried lavender and any other plant materials I’m going to use. The above wreath is only going to have those four roses with the lavender. I attached the roses first and then worked around them, starting on the top right. I tend to work out from the top, first going right half way around, and then working from the top again and going left.

I cut the lavender a bit more than one width of my finger space from the flower.

It can be a tedious task, as it takes many, many bunches of lavender to fill the wreath! The up-side is that the room smells wonderful while working with the lavender!

I love my GelPro classic gel mat, especially when standing on tiles for so long! (I also love my sparkle Birkenstocks)

It takes patience, but it is lovely to see how it fills in and of course the smell is wonderfully relaxing!

One little bunch at a time!

The next wreath had lots more plant material! I didn’t use the artichoke which is in bloom on the table, as it was too big.  I did use a tiny one, though.

The lavender in the center of this wreath is actually from last year. You can see the difference in color when I add the outside layer.

close up of the roses, poppy seed pods, Rosemary and artichoke

It was only after taking the close-up picture above that I realized that the wreath would look better with another layer of lavender. It just looked like it was missing something.

Filling in an outside layer of lavender.

Ah yes, you can see it now, can’t you?  The inside layer is definitely lighter! 🙂 This is where the two plus hours comes in…

The third lavender wreath will have poppy seed pods and roses.

My third lavender wreath had roses and poppy seed pods.  I started at the top left for this one, and placed the roses on the right.

Pinning the roses on.

The roses are also from my garden.  I try and cut as many as possible early in the season so they will be dried enough for the wreaths.  I think I’ve finally decided that it is best to cut them while they are still closed. They will still dry even when opened, but the color stays darker when they are closed.

The poppy seed pods were neat!

I really like the poppy seed pods!  This is my first time using them in a wreath. I know they dry brown, so I’m not sure how it will look in a few weeks time. I’ve also learned NOT to turn the wreath upside down as millions of teeny tiny seeds will go everywhere! 🙂

I LOVE making lavender wreaths! I had to stop at three because I don’t have any more wreath forms and I can’t seem to get my hands on them here!  Please let me know if you see where I can buy them in Ireland!

Plain and simple with LOTS of lavender.

A little bit more than “plain and simple”, but still LOTS of lavender!

Over the top! A lavender wreath with yarrow, roses, poppy seed pods, rosemary, and one globe artichoke. Oh – and LOTS of lavender!

Whatever lavender doesn’t get used in the wreaths will be taken off of the stems and stored in containers to be made into sachets (eventually).  The lavender stays fragrant for a very long time!

There is lavender growing around our playhouse, too!

I have not harvested all of my lavender, as that wouldn’t be fair to the bees!  No, there is still plenty for them.  I will have to trim those plants later in the season, after the bees are finished with them.

I hope you enjoyed seeing how I create my lavender wreaths!

In peace,
Dana

“… the only thing we have to fear is fear itself…”

Franklin Delano Roosevelt, who happened to have a home in Hyde Park, NY, which is not far from where I’m from, was speaking in his first inaugural address as U.S. President in 1933, in the depths of the depression, when he spoke the words “the only thing we have to fear is fear itself”.  What a statement of truth. Although, thankfully, I have never had to face anything like the Great Depression, I have found myself thinking from time to time, of this statement about fear, as I conquer little fears in my life.

I was fortunate to be able to bike with my brother during a visit home to the US. We had fun cycling along the greenway in Connecticut.

You might laugh, but one of those little fears of mine was of using clip-on cycling shoes. (I said you might laugh!)  A number of years ago I became interested in triathlons. I trained and competed in a few, and I had a lot of fun doing so. Typically though, when cycling for the distances I was, you’d trade in your sneakers and pedals for special cycling shoes which clip on to special pedals. Of course, being clipped in means that you have to unclip to be able to put your foot on the ground to either balance yourself or get off of the bike. It takes some getting used to, to be able to quickly “free” your foot.  You’d be surprised at how often you’d have to stop suddenly, and put your foot down quickly! If you don’t unclip fast enough, you, and your bike, tip over.

I enjoyed triathlons for a number of years. This was a special bike that I had (and used) for 15 years! (notice the cages on the pedals)

Well, I was afraid of tipping over so I stuck with my sneakers and ordinary pedals … for years (many, many years).  When we moved to Ireland 10 years ago, I stopped cycling for a while. But a few years ago I started again.  Then last year I upgraded my bike, and finally, just a couple of months ago, I decided to upgrade to clip-on shoes.  Even entertaining the idea was huge progress for me!  I was finally leaving my comfort zone. I had the support of my husband, who has become an avid cyclist.  He knew that after I got the hang of them, having the proper cycling shoes would actually help my cycling! Oh I was so stubborn, due to my fear.

My husband and I biked 90 km round trip to Bergerac, while on vacation in France. I tipped over at around 30 km – but I’m still smiling!

The first few cycles with the new shoes went great, but I hadn’t really been tested with a need to quickly un-clip.  That would happen on our vacation, when we were cycling in traffic!  There was, as it usually happens, a need to stop quickly and I was able to un-clip in the nick of time! Let me tell you that my heart was racing!  Well, that worked out O.K.; I managed to not fall over, or get hit by a car!

I loved biking and enjoying this amazing scenery along the coast in France.

There is a little more to this story, though. On another outing while on this same vacation, I managed to actually tip over.  I was really lucky to have it happen the way it did!  We were in the country this time (no traffic!), and I was going really, really slow as we were debating if we were going to turn around at this junction or the next, and as I went to turn, I hadn’t maneuvered properly and as if in slow-motion, I tipped over! Thankfully I didn’t hurt myself, and I learned that you can still un-clip as you are falling. 🙂

We enjoyed cycling along the greenway paths in France.

I’m still super cautious with un-clipping, but I’m so glad that I finally switched over to proper cycling shoes.  They really do make a difference with your cycling!  And it all came down to conquering my fear.

Here we are on a break while biking around our home turf in Annagassan, County Louth.

As I get older, I have become more aware of little fears that have held me back. Little by little, though, I’ve been learning to face them and over come them.  Because if we face what is in front of us, then as FDR said, “we have nothing to fear but fear itself”.

My husband and I really enjoy cycling together (my cheeks are really pink from working hard!)

What little fears will you conquer?

In peace,
Dana

And this is what all of the fuss was about! Well, sorta. The fuss was really about overcoming a fear, which, although it took years to do, I did overcome. It’s those little things that make us who we are 🙂

End of a Chapter

In the beginning… Emer and I in 2007 at a swim gala

They say all good things must come to an end.  But maybe instead of it being the “very end”, it is just the end of a chapter? … My daughter and I are just home from the Stuttgart International Swim Fest competition, and with the end of that competition is the end of the season for us.  Since she will be going away to college next year, it also means the end of her swimming with the team.  For the past 8 years I have been coaching with the team while she swam.  But with her leaving, I felt it was the right time to say “good bye” to the team.

My daughter and I at a Sliabh Beagh event in 2015

I swam competitively from the age of 10 all the way through and including in college.  I loved swimming, and being a part of a team, and I was lucky to have had some very good coaches.  Fast forward a few years, and my daughter, at four years of age, asked if she could join the summer swim team! The summer swim team was all about having fun in the water, and she loved it! After our move across the ocean a few years later, her love of swimming continued and we were super fortunate to be introduced to the Sliabh Beagh swimming club (pronounced Sleeve Bay, and named as such after the mountains in the County Monaghan region).

The Sliabh Beagh Aqua Sprint squad after winning their 2012 final

It was at a swim gala in the early days with the club that I was talking with one of the “senior” parents on the team, when the topic of coaching came up. During the conversation she asked if I’d be interested in coaching with the club.  Honestly, I’d never thought about coaching before then.  Also, I wasn’t sure what it would be like coaching the youngest squad!  But I went through the coaching courses, as well as licensing, and pardon the pun, I then dove right in! I was very lucky, the kids were great, the parents were supportive, and our coaching team was excellent. I have learned so much over the past 8 years!

The Sliabh Beagh Aqua Sprint squad after winning the 2014 finals (I think I am calling for someone to join in the picture…)

My younger daughter joined the team as well.  I stayed with the younger squad while she was swimming with them, and then moved up the squads as my girls did.  My girls were receptive to my coaching, and never minded when I was in their squad, and I’d go so far as to say they liked it.  🙂

My two girls at the National Aquatic Center in Dublin for a swim competition

I was a tiny bit surprised how much I enjoyed coaching. I mean, I loved coaching. It was so much fun helping the kids to achieve their best, and watching their improvements along the way.  I’d have to say that I was persistent with my kids, until they were finally able to maintain the changes/improvements in their strokes.  I learned that you can’t coach everyone the same.  That can be a little tricky when you have lanes filled with kids, but I think over the years I managed to figure it out.  My favorite expression from our head-coach (he has LOTS of expressions) is that Rome wasn’t built in a day.  I’ve used that countless times, not just with the kids, but with myself.  It takes time to make changes, and make things happen.

My daughter and I at Division II swimming competition in Limerick 2014

I’ve coached a lot of kids, and I’ve seen kids with natural talent, kids with a huge passion for swimming, and kids with an incredible work ethic. There were, too, the kids who were just in it for fun, and that’s O.K., too.  I think what sticks in my head most is that every little thing counts, and when you focus on all of those little things (one at a time!), you can achieve your goals. It takes time, remember, Rome wasn’t built in a day, but with persistence, it is possible. That mindset is completely applicable to everything in life!

Sliabh Beagh swim club, swimmers, parents and coaches in Eindhoven 2017

Our family has really enjoyed being a part of this team.  Everyone, from swimmers to parents, to coaches, has been great to work with. Three years ago they started a new tradition of attending an international swim competition near the end of the season.  That has been one of the major highlights for so many of our swimmers and parents! For some, that is the end of their season and they really end it on a high!  We’ve been to Stuttgart, Germany twice and Eindhoven, The Netherlands once.  All three trips were so much fun for everyone!

The Stuttgart International Swim Fest opening ceremony in Germany 2016

Swimming outdoors, for our Irish team, was so much fun! My younger daughter and I at the Stuttgart International swim fest 2016

It is bittersweet, stopping coaching for now.  I still love it, but our team practices at 5:45 A.M., and it is a 40 minute drive for me.  That equates to an insanely early start to the day!  It sounds a bit crazy to non-swimmers, but to swimmers who understand the dedication that is necessary, and getting in those minimum two hours of practice a day, this is our reality.  And since my younger daughter had to stop swimming last year for medical reasons, I won’t have anyone swimming with the team.  So for now, I think a little break would be nice.

My daughter and I in Eindhoven at the International Invitational Swimming Competition 2017

It is wonderful to see the kids continue on and swim in college, too.  Our goal as coaches is to develop Long Term Athlete Development and encourage “Swimming for Life”.  We want to keep kids swimming into old age!  We’re not interested in quick rises to the top and then burnout, which can happen so easily in this sport.

My daughter and I on our way to Stuttgart 2018

Sliabh Beagh ASC – swimmers and coaches, Stuttgart International Swim Fest 2018

I was very lucky. We were part of a team where the swimmers benefited hugely from the way the team nurtures the overall well-being of each swimmer.  They nurture good team-mates, and character, in addition to helping to build top-class athletes. This stemmed from the team’s founders, head coach Eamon and his wife Ita.

I have learned so much from our head-coach Eamon and I had a lot of fun with my Aqua Sprint co-coach Linda!

I am so thankful to have had the opportunity to coach such great kids along side some great coaches and an amazing support team.  I appreciate how wonderful it is to be able to do something you LOVE!

Our team secretary, Claire, who does more for our team than any one human being could possibly do!!!

And just like that, the chapter is finished …  Thank you so much for the wonderful memories,  Sliabh Beagh ASC.  It truly has been a gift.

In Peace,
Dana