Hi there! As I mentioned recently, I crocheted a blanket for my first daughter when she went to college a few years ago (you can see that blanket here). So of course when our second daughter was getting ready for college, the topic of another blanket came up. I wanted to make one for her, too! She started college this past fall, and I finished her blanket this winter.
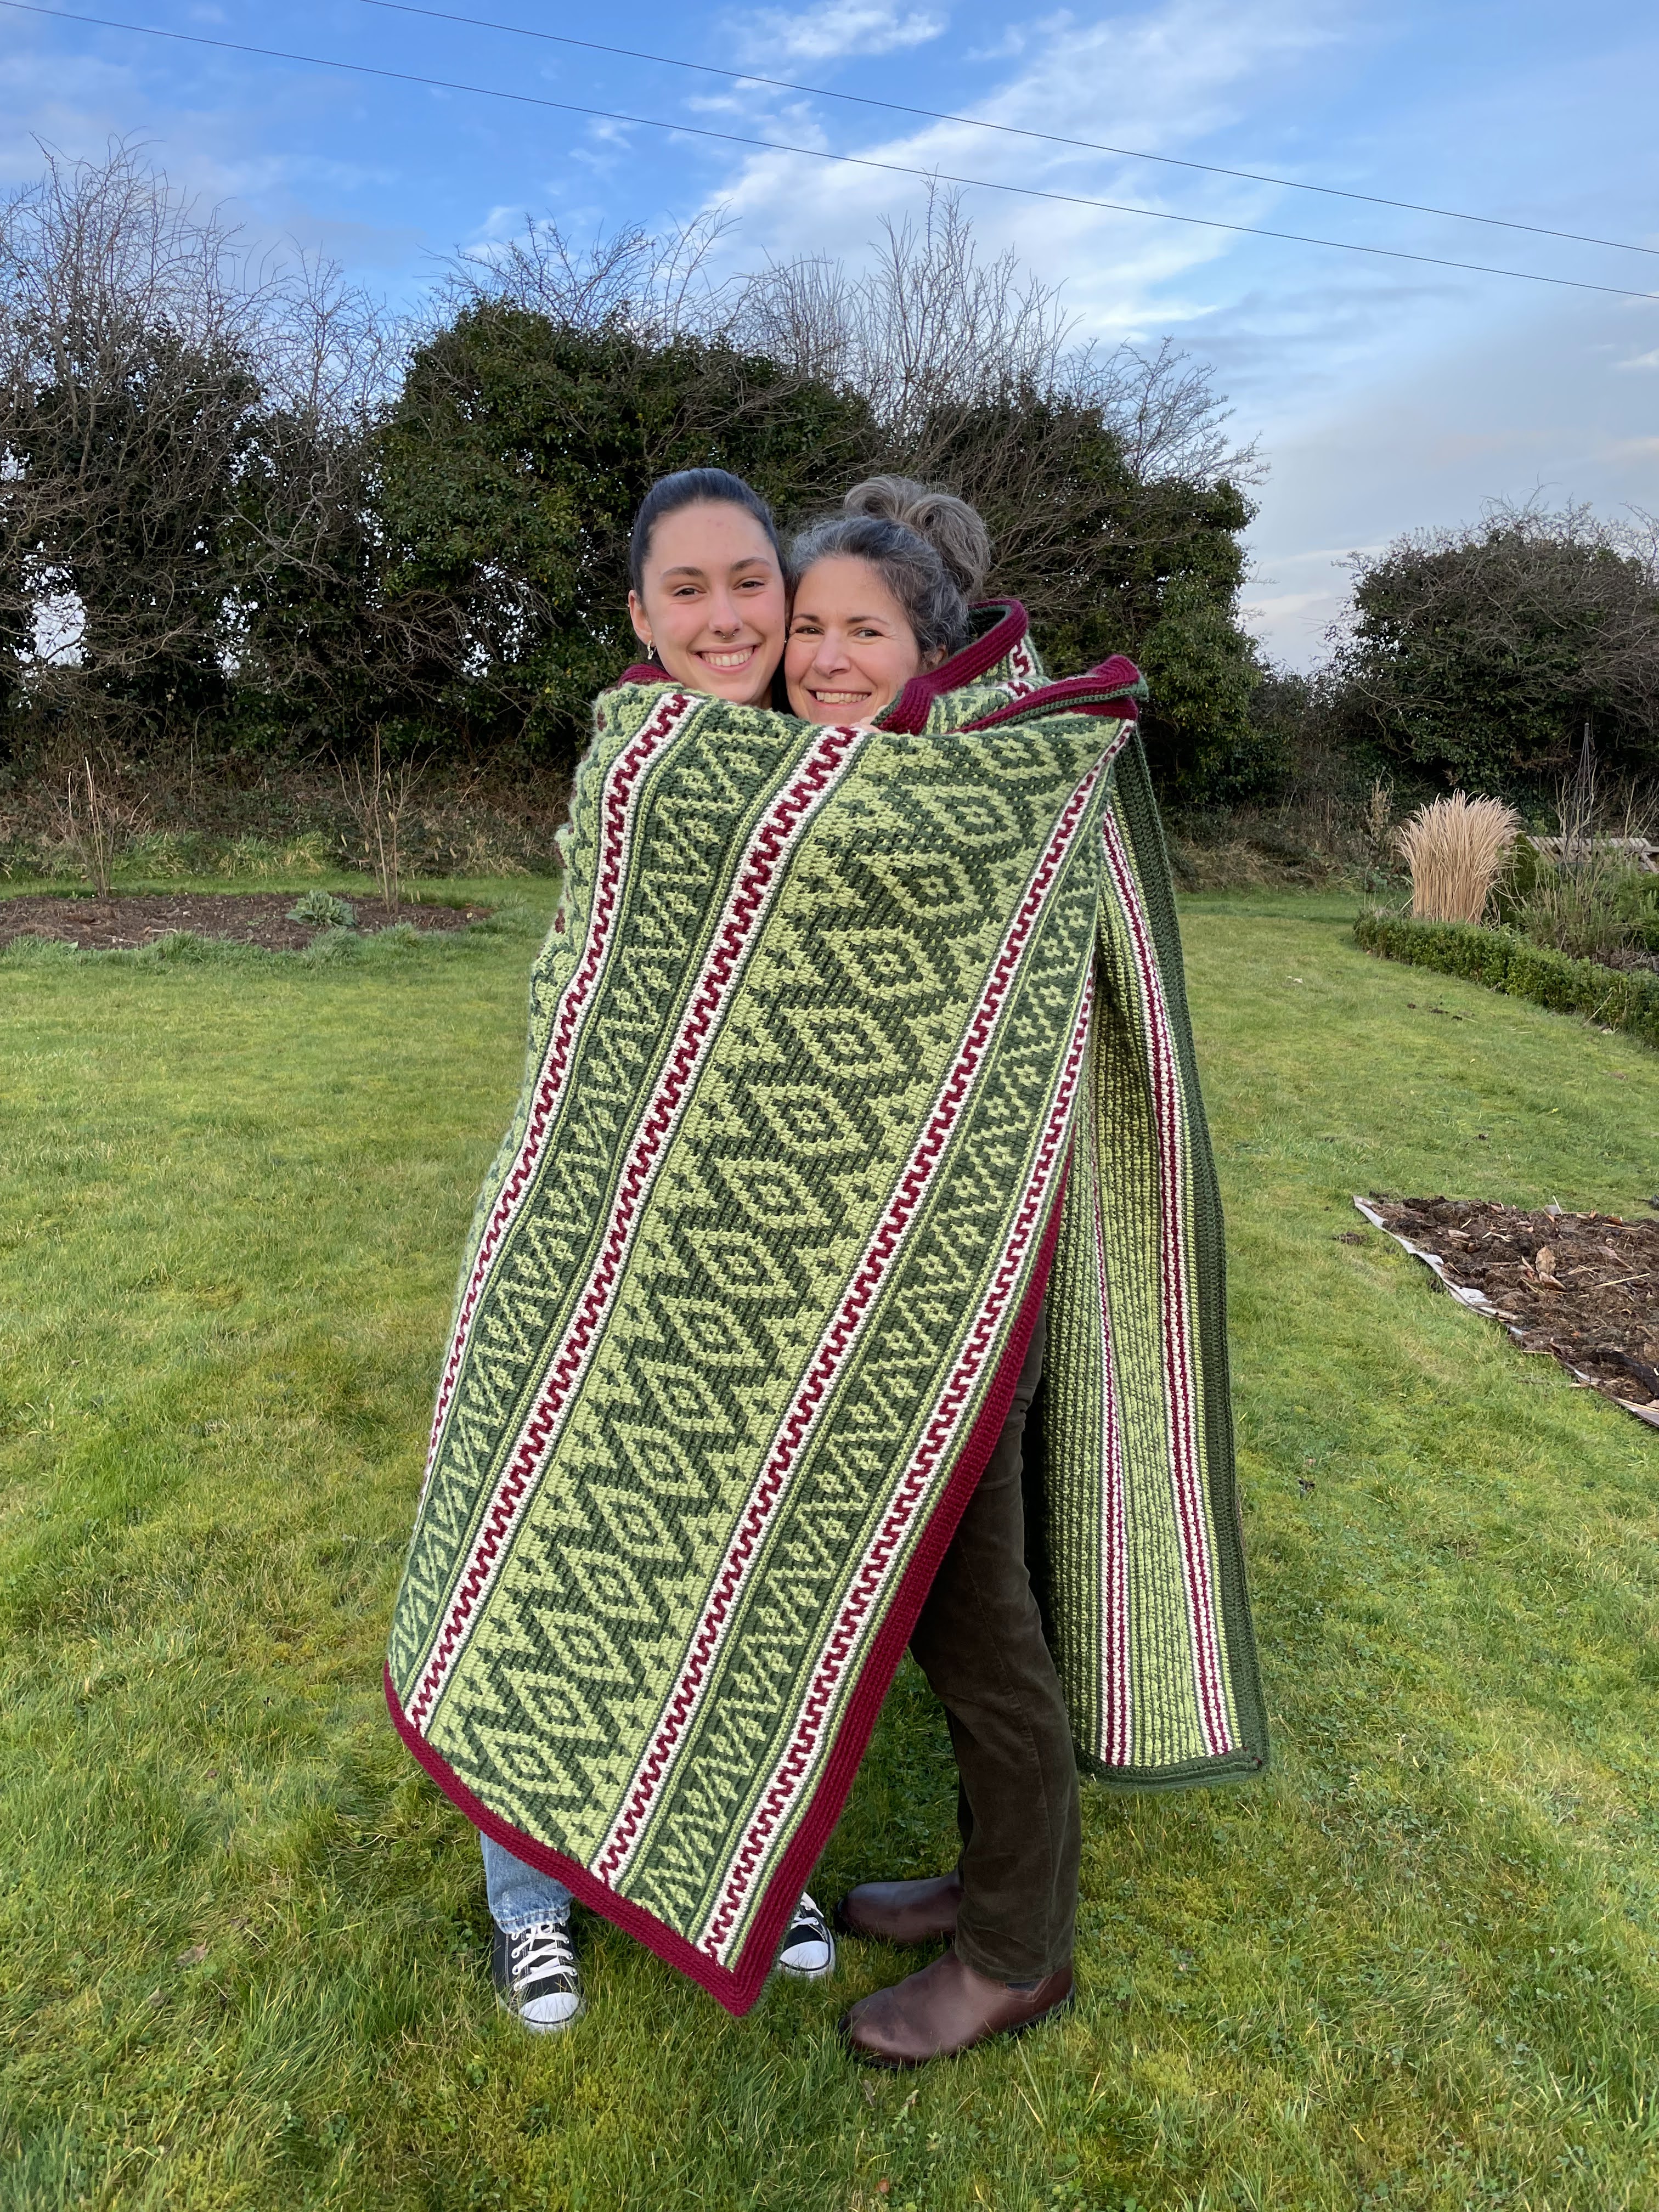
Crocheting is a hobby I learned as a young girl and have enjoyed doing ever since. I like to learn new crochet techniques or try new patterns. I especially like working with lovely colors. Sometimes, the hardest part of a project is finding the right pattern to use with the right colors. It took me a long time to find the right pattern that was a good fit for my daughter. But after going through many, many patterns, we found one that was perfect! She then picked the colors, which are beautiful earthy tones of greens, brown and burgundy and cream.
The pattern is called Geometrics and is by One Skein of Love. At 92 pages long, the pattern is incredibly detailed with lots of pictures to ensure you keep on track. I found it to be a good pattern and enjoyed the rhythm of making the blanket. It was a little unusual for me, as it is made row by row and not in rounds. Also, the border is made up of two layers (front and back) that are crocheted together. That was a great way to avoid weaving in all of the ends from every row!
I used Caron ‘Simply Soft’ yarn, which is my favorite for blankets. And I used Amour Crochet Hooks by Clover because they are really comfortable.
Ta-da! Here it is! It is large enough to cover a single bed.
My daughter likes it!
It was so neat to watch the pattern unfold with each row! Honestly, this was not a difficult blanket to make. It is all single and double crochet (American stitches). 🙂
The backside of the border is dark sage green and is as pretty as the burgundy on the front. I actually left a row of green showing on the front border, as I liked the two colors together.
I think it looks fabulous (great pattern)!
It certainly was a busy winter for crocheting this year. I wonder what project will be next? 🙂
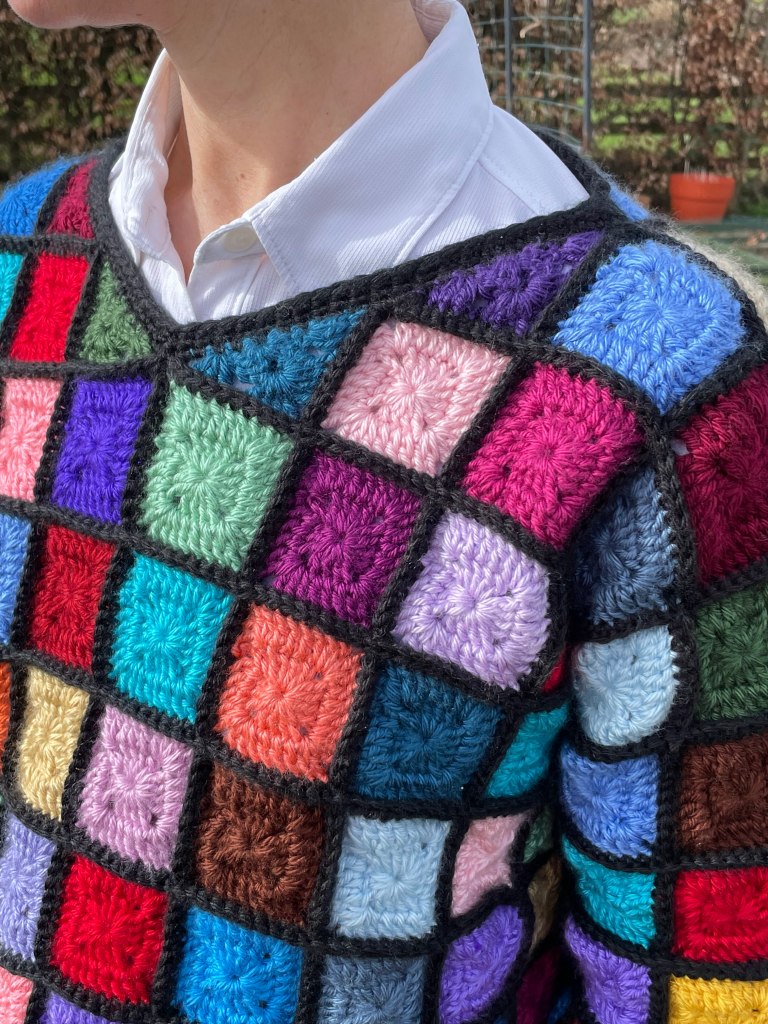
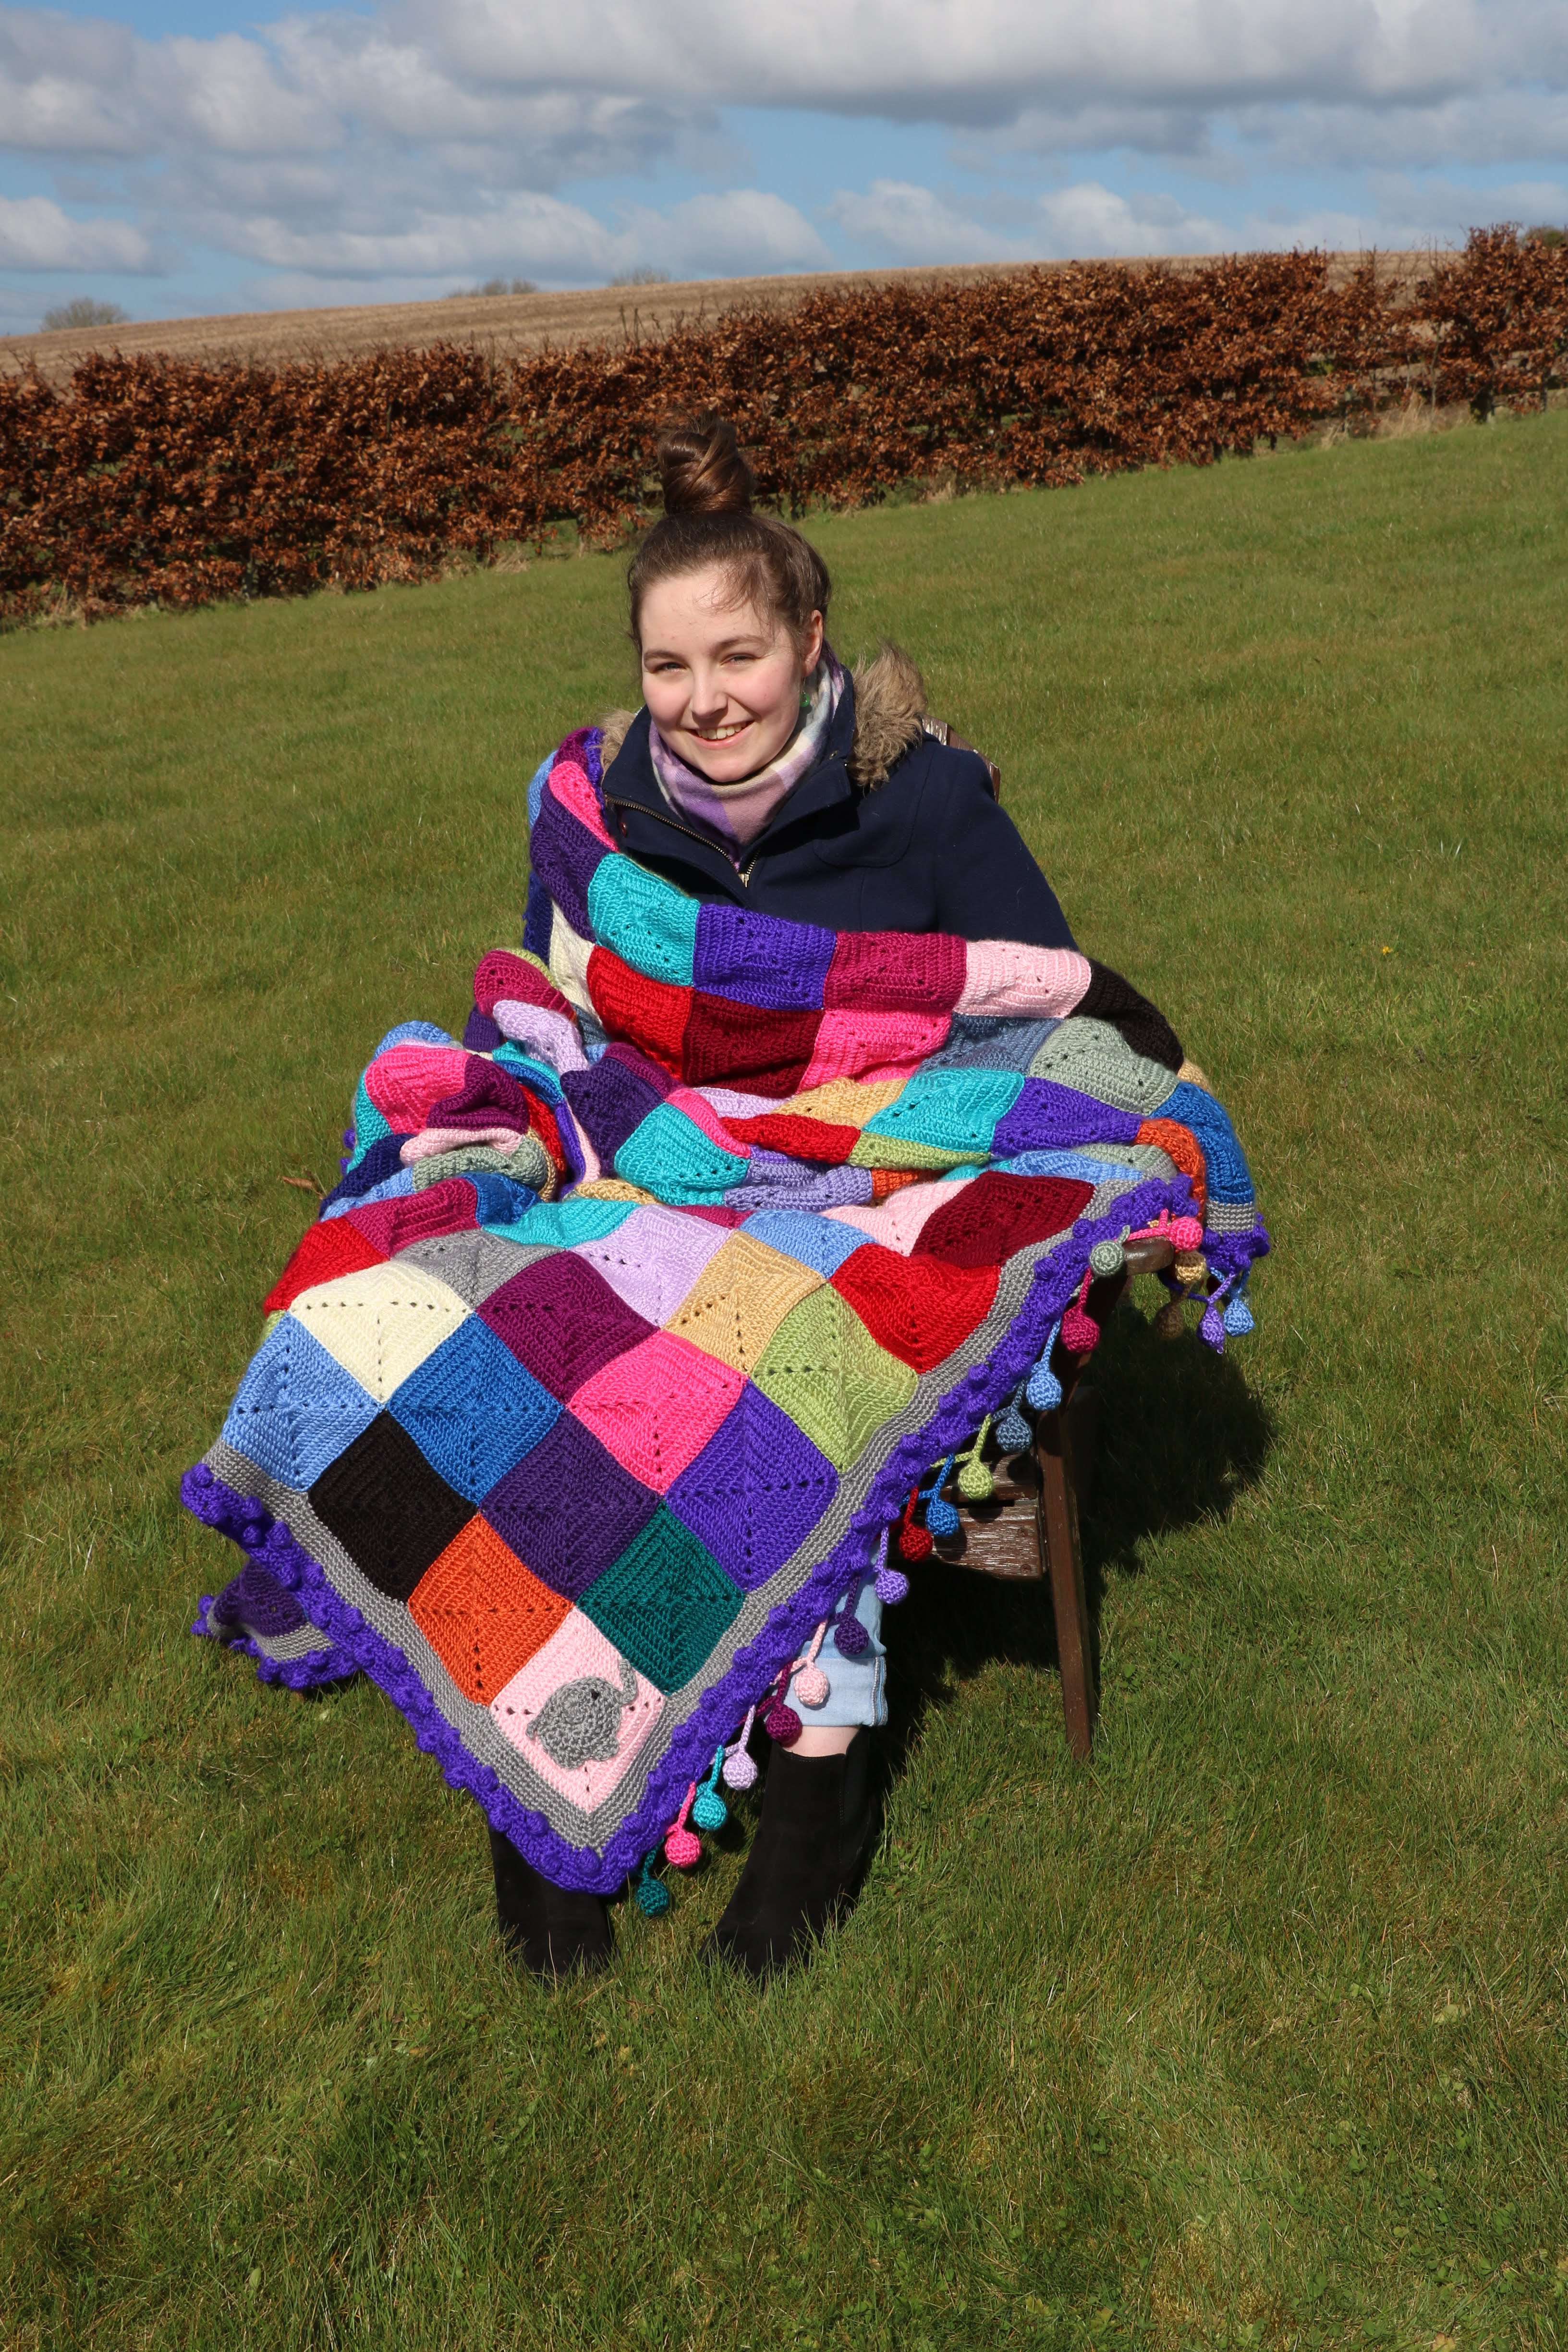
Hello! Well, Mother Nature has decided to keep us chilled a bit longer with another cold snap. The timing is perfect for me, as I just finished crocheting what I am calling an ‘Elmer’ sweater. Elmer is a colorful elephant from a children’s story, by David McKee, who teaches that being yourself is the best way to be. I made an Elmer blanket for my daughter a few years ago (you can see it here). The difference this time is that I added black while connecting all of the colorful squares, and Elmer the elephant doesn’t have that. I’ve been told by friends that this gives it a stained glass look. 🙂
Making this sweater was a huge challenge for me because I did not have a pattern, and I have not made many sweaters. All I had was an idea in my head. It was definitely a learning process, but in the end I was happy with how it came out. I made tiny granny squares, just two rows each. It took me about two months to make, and required way more squares than I’d originally thought! But I loved working with all of the different colors (29 Caron Simply Soft colors in all). A few years ago I switched to Amour Crochet Hooks by Clover. They have made a huge difference with comfort.
The colors should be random, but I did try – really hard – to make sure they were spaced out. This picture is of the back after I took apart my first block of sewing them together. I realized I needed more rows in both directions, so it was easier to unravel the joined up squares and start again. I had a tough time deciding which color to fill in that space with!
This image shows the original block, mentioned above and that was too small, on the right. On the left is the draft of the front of the sweater – including the ‘v’ neck, but without the ‘half squares’. I ended up going with 10 squares across and 8 squares down. The half squares took some fiddling with to get the stitches right – I needed to have 10 stitches on each side. I eventually figured it out! 🙂
My patience were very low with this project as my excitement was very high! Also, since I wasn’t sure what would have to be re-done or re-worked, I kind of rushed through parts to see if they would work. This picture shows the front, back and one sleeve pinned together to see if the sizing worked (it did!).
I knew I wanted a ‘v’ neck, but I wasn’t sure what that would look like. I decided that I would keep the border for all three edges (neck, sleeves and bottom) a simple three layers of black. It just felt right.
So many colors!
Ta-da! That was a fun project. I’m glad I did it, despite not being sure if I could figure it out. And it is a very warm sweater! 🙂
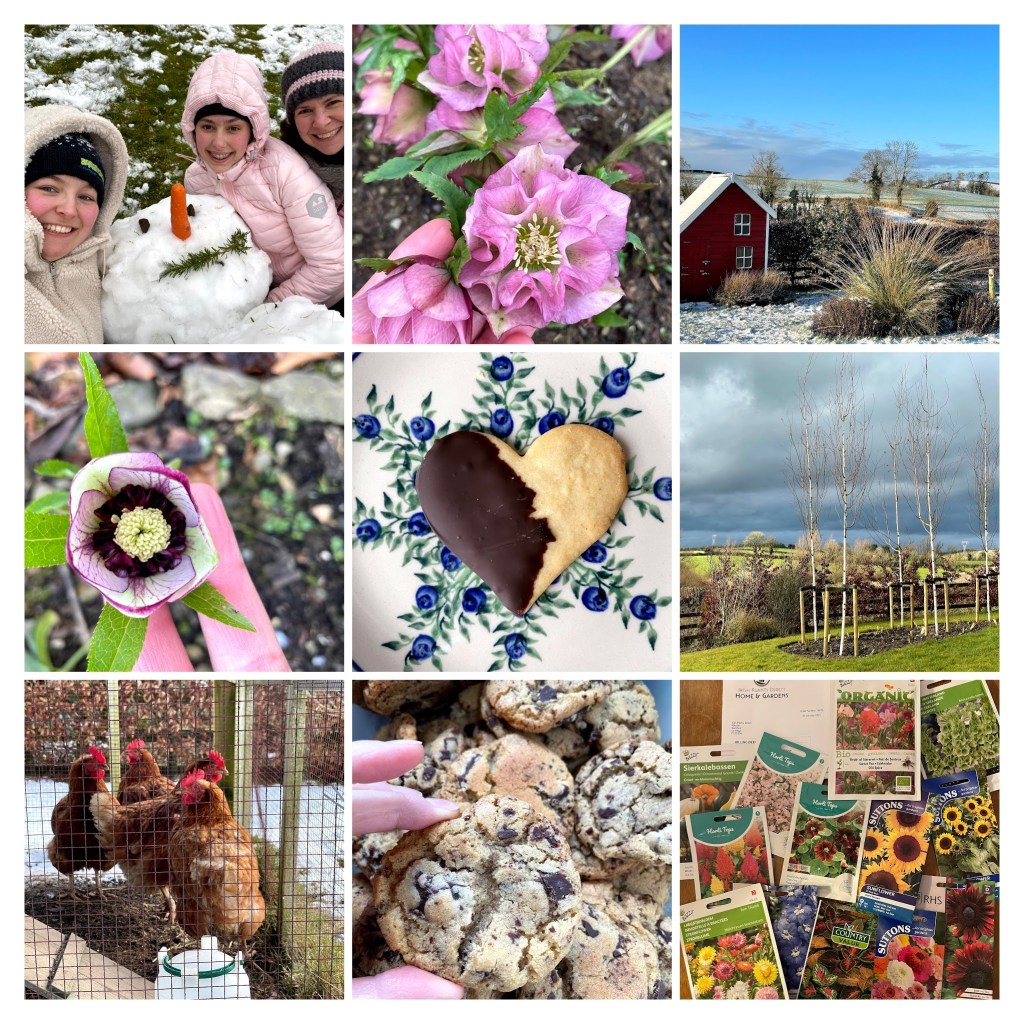
Happy New Year! While life all around us is still rather unsettled with Covid-19 (the Omicron variant being the latest cause of widespread infection), there is one thing that, thankfully, remains a constant: the garden. January is the perfect time to look back over what we grew in the garden last year. I like to reflect on what did well, what didn’t, and think about what we want to add. I’ll do this in four parts, using a collage of pictures. Shall we get started? 🙂
We had a light dusting of snow last January, which made everything quite pretty. The snowdrops are usually the first to flower. I’ve just checked today on the snowdrops and they have pushed through the soil, so it shouldn’t be long now before they bloom again! Also early to flower are these ‘Winter Sunshine’ hellebores. This plant in particular flowers profusely all winter long, and when the leaves aren’t suffering from black spot, the leaves are a very pretty blue-green (I cut them off if they have black spot, and the plant does fine). I took a picture of our compost heap because it really is amazing stuff, despite its messy look. As for my Rhode Island Red (hybrid) chickens, I can never resist taking pictures of the girls’ fluffy bums!
We had (just) enough snow in February to make a snowman! My daughters and I had a fun time in the snow. I’m so thankful that they have a silly side and that they want to include me in their fun! We also did some baking – dark chocolate is our favorite to bake with. As for the garden, a couple more of our hellebore plants started to flower. The single hellebore flower is Anemone Picotee, while the more showy hellebore is Frilly Isabelle. Funny enough, not all of my hellebores flowered last year. I know that last year I cut their leaves late in the season, so I didn’t do that this year. (I’m not sure that would do it, but worth a shot.) The birch trees were only planted in November of 2020, so I took a lot of pictures of them. You can just barely see the bearded iris stumps at the bottom of the trees, the first plants I added to the birch tree bed. The chickens weren’t sure what to make of the snow, but thankfully, it wasn’t around for long. This was also the time my seeds arrived, which is always a time of excitement. 🙂
A few more pictures from February, as I added a couple new hellebore plants underneath the birch trees: Harvington Double Apricots and Harvington Double Reds, both of which came from Altamont Gardens, in County Carlow. They are both very frilly and showy, making them just perfect. The snowdrops also opened up nicely, which can really be appreciated on a sunny day. I don’t have the name of my pink hellebore, but it is a ‘single’ and very pretty. We did some more baking in February, too!
Moving right along to March, I’ve captured here the single pink anemone that I have. It is quite a bright pink color, while all of the rest of the anemone in my yard – and there are a lot – are purple. The end of February / beginning of March is when I gave my rose shrubs a hard prune. That worked out great this year, as the roses did really well. I am slowly learning that to prune more is better than to prune less with my roses. The Pulmonaria flower, in the middle, blooms along with the daffodils, and is a nice companion plant to them. This variety (whose name I don’t know) also has pretty spotted leaves. I so enjoy having chickens and getting fresh eggs every day! They are such a treat. Not to be outdone by the chickens, Kitty enjoys being in the garden with me. While I do take lots of pictures of her, you can also find her photobombing her share of pictures. And we have another picture of our compost! The compost benefits from being ‘turned’, the more the better. But even if it is just left over the winter (sorry to say that this happens a lot with us!), the bottom of the heap will be good to use by the summer.
March (and creeping into the start of April) brings more color into the garden, with ranunculus, tulips, daffodils, hyacinth, anemone, bergenia (this one is a white variety) and our magnolia tree in bloom. The Aubrieta definitely steals the show in the rose bed at this time of year. That pink ‘pops’ from clear across the yard. My plan was for it to grow over and down the wall. Its plan is to grow into the garden! I’m hoping my plan wins. Last March is also when I started some flowers in seed trays. This was the first year I tried this, and overall it went well. The coleus and delphinium were the biggest successes, or at least my favorite.
I was a little busy with this creative project, too, last March. It’s kind of fun to look back on what kept me busy! It actually took about 6 weeks to make this baby blanket. It was a fun project that I was very pleased with. But I haven’t really worked on any crocheting since, which means it’s about time to start again!
I skipped our biggest project which we started last March: the cleaning up of the veggie/fruit garden and the addition of the pumpkin arch. I will definitely cover that in my next post.
Meanwhile, I hope you are staying healthy, and are having a good start to the new year!
In Peace, Dana
P.S. The feature photo is from last year, we have not had snow this year (yet?).
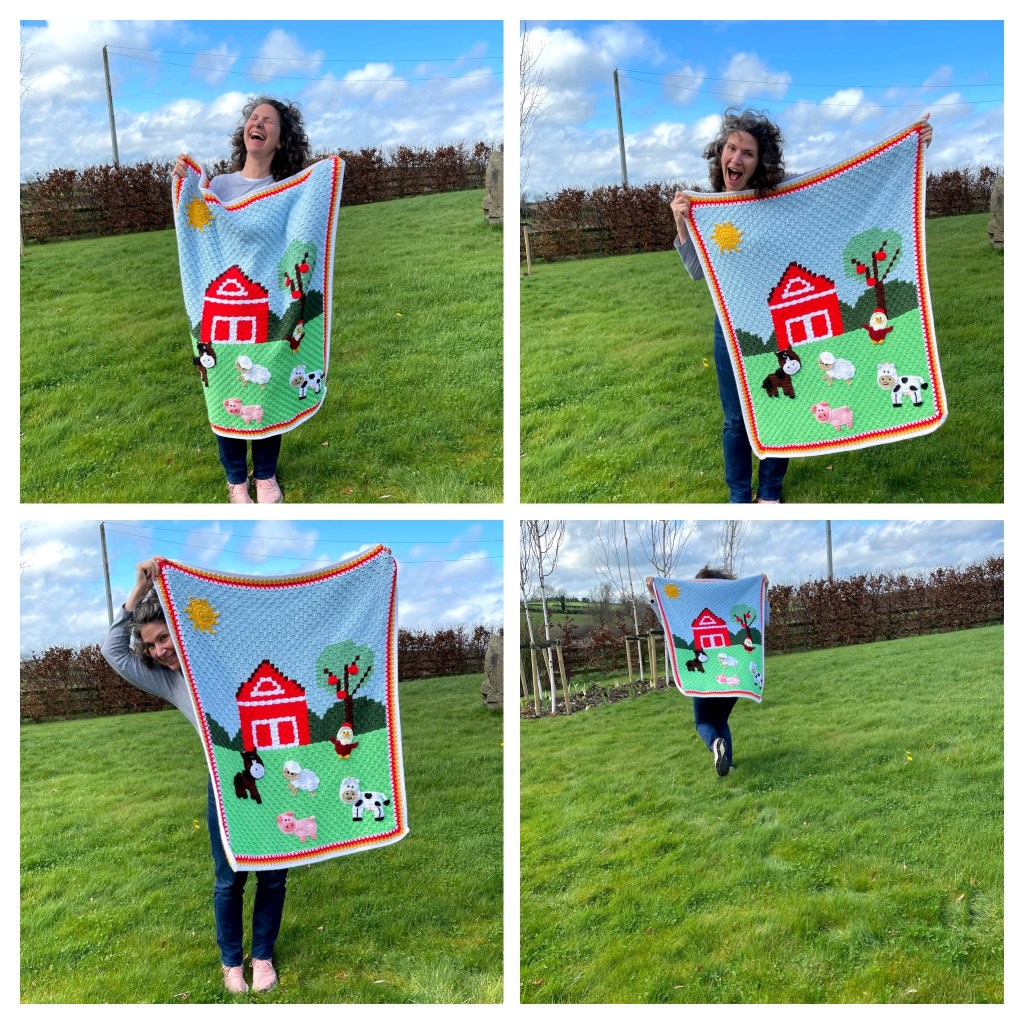
Hello and welcome to my blog! Did you ever come across a gift for someone in particular and think ‘this is perfect!’? Isn’t that the greatest feeling when that happens? That happened to me recently, when I came across a pattern for a baby blanket. Now, honestly, I think all children enjoy farm animals. But this particular friend who was expecting her first baby has farming in her blood – and a tractor in her wedding pictures to prove it! So I decided that this was the blanket that I’d make for them.
The blanket itself is a ‘corner to corner’ pattern, meaning that it is made diagonally from one corner to the opposite corner. I found the pattern, which was easy enough to follow, online at crazy patterns. The fact that I already had in my ‘stash’, every single color that I needed was rather amazing. See, it *does* pay to stock up on all different colors of yarn! I used my favorite yarn, Caron Simply Soft.
The animals and sun are applique, meaning that they are made separately and then sewn on top of the blanket. My favorite aspect of the blanket is that there are moving pieces: the horse’s mane and tail, the pig’s ears and tail, the chicken’s beak and feet, and the cow’s udder and horns are all moveable. Actually, the original pattern didn’t have an udder. So I went looking for an udder pattern and added it. I think it is the best! The pig’s tail is curly, which I think is very cute.
After making the blanket, then making each of the animals, and then sewing them all on, I took a little break! Luckily, the baby decided to take her time getting here. 🙂 The pattern called for one simple border of a single row of a similar stitch to the blanket, in white. I did that, but I didn’t like it. I then tried a few different iterations, and undid them as well. Funny enough, I asked my kids’ input and between their idea and mine I came up with a border that we were really happy with.
It was made, washed, dried, and wrapped in lavender in time for the arrival of the little one (yay!). It is such a wonderful feeling when a handmade gift is appreciated. I’m happy to say that they really liked it.
Here’s to finding the perfect gift!
In Peace, Dana
This is what a ‘corner to corner’ blanket looks like while in progress! The awkward part is that all of the colors are attached as you use them (see top right picture). I took over our ottoman for a while, so as not to get the skeins of yarn tangled!
So here is what the blanket looked like as I figured out the border. The top left is without any border. The bottom right is the original pattern (which I undid). I definitely wanted to have red in the border, but it was a bit harsh on its own. The compromise was to add the sun yellow and then white.
You can see the ‘moveable’ pieces in this collage. The beak, the cow’s udder and horns, the horse’s tail and mane are all moveable. The top right picture doesn’t have the final color of white on the border yet.
Ta-da! I was quite pleased with the final outcome!
It was time to have some fun with the blanket photoshoot! I did a ‘running’ picture when I made my daughter’s Elmer blanket, so I thought I’d do that again 🙂
I like to challenge myself with new projects and with this one, the animals were definitely something new for me. I enjoyed learning how to make them. The eyes were tricky. There are plastic eyes you can buy to attach, but I never like that idea for baby blankets (choking hazard?). So they are all a bit different.
The pig was the first animal I made. 🙂
The cow looks a bit bare without any spots!
I really enjoyed making this blanket and seeing it come together with all of the animals. I’m a very slow crocheter and I only worked on it in the evenings and weekends. It took about three weeks to make the body of the blanket and then another two weeks to make the animals and finish the blanket. It was time well spent. I wonder what my next project will be? 🙂
Hi there! How are you? I hope you are safe and well, and able to do things that bring you joy. Today’s post isn’t about gardening, but about my second hobby: crocheting! I really enjoy having projects to focus on. As it turns out, at the start of our ‘stay at home’ orders due to Covid-19 here in Ireland, I was asked to make a blanket for a sweet little girl who liked pink and purple. This was a perfect distraction for me, and a project which I really enjoyed!
The c2c blanket is made ‘corner to corner’
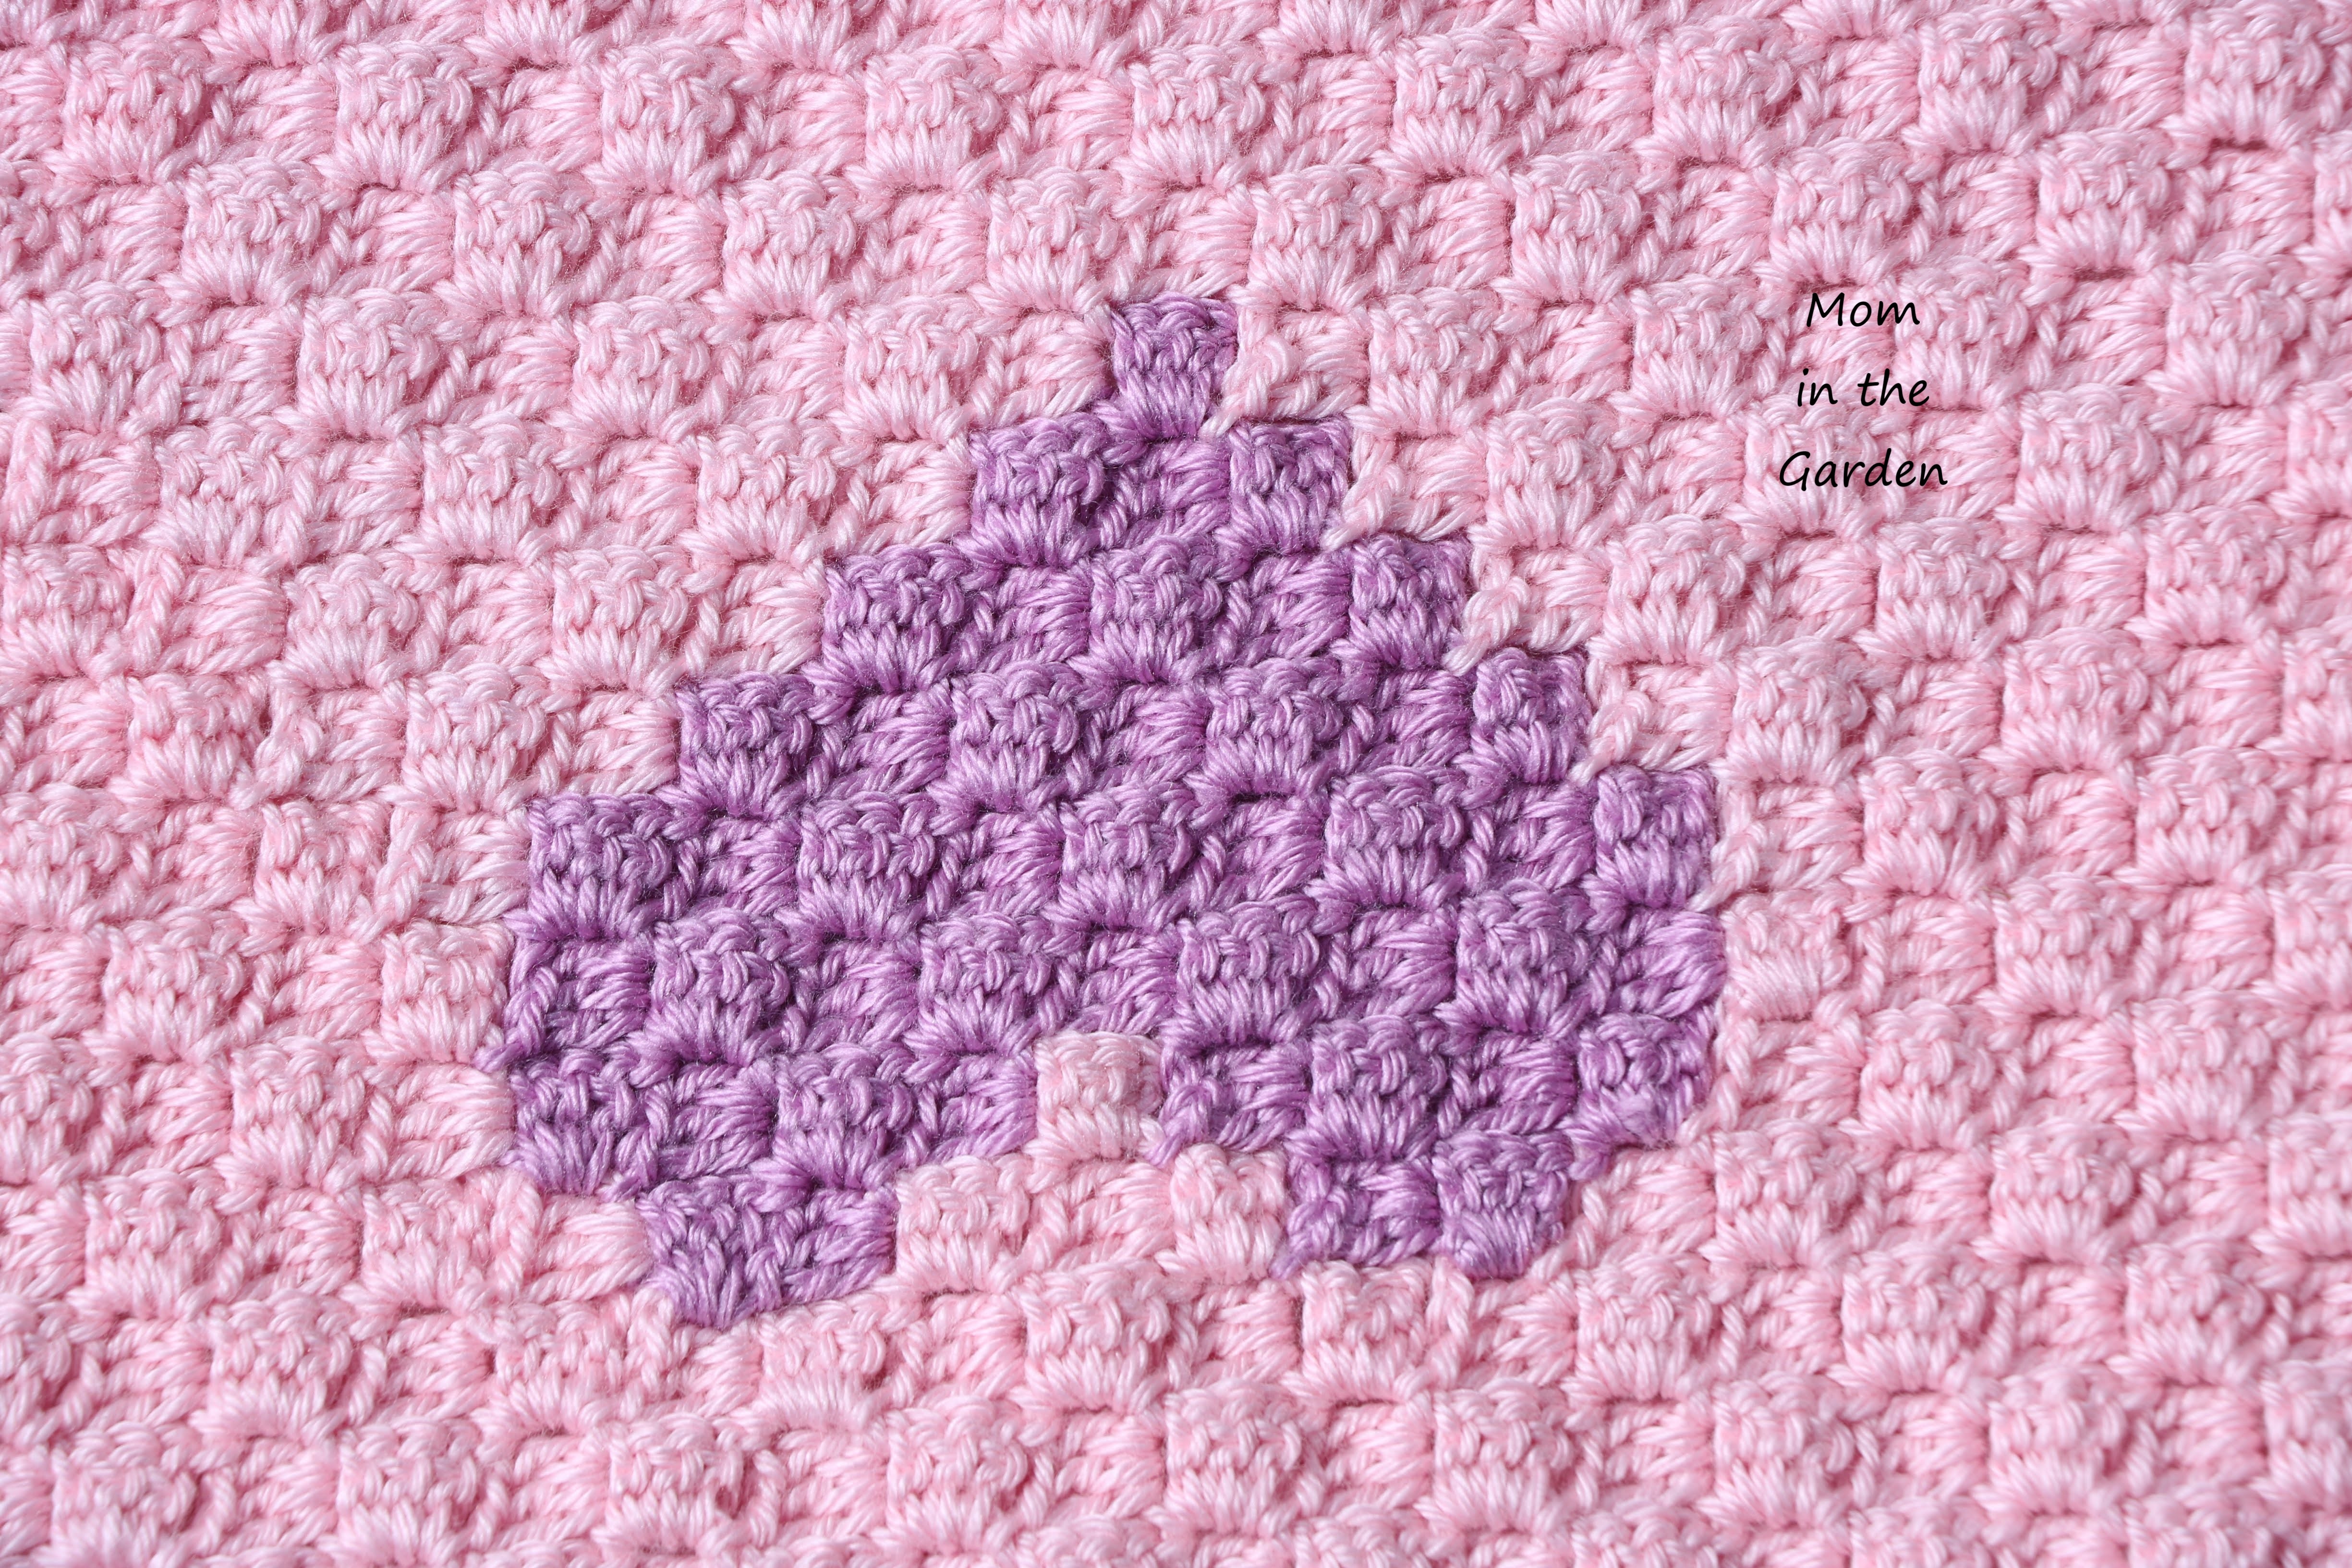
I like crocheting and creating with my hands. I have to say that I like a bit of a challenge, too, and to learn new stitches or patterns. So I went searching for something new to catch my eye for this blanket. I was very lucky to come across a lovely heart blanket from Motorave_slc on Instagram (she’s also on Etsy: Motorave_slc). I sent Jessica a message on Instagram and she kindly sent me the diagram of the blanket, which is the basis for the pattern. This was a lovely act of kindness on Jessica’s part, which I’m so thankful for!
the back of the c2c half way through
This blanket pattern is called ‘corner to corner’ (written c2c). Unlike traditional blankets which are made row by row from bottom to top, this blanket is made from bottom right corner to top left corner. The main stitch used throughout is a double crochet (American terminology) done in groups of 3, along with chain stitches – all very easy. Once you get the hang of the pattern, it is fun to make! The interesting part was having all of the colors attached to the blanket as you create it, which at some points in the blanket was tricky to work around!
The pattern had two upside down hearts
I started off watching a video tutorial by The Crochet Crowd. Over the course of nearly an hour, they covered every aspect of making a c2c blanket as well as creating and reading a c2c pattern. After all of that I was finally ready to begin!
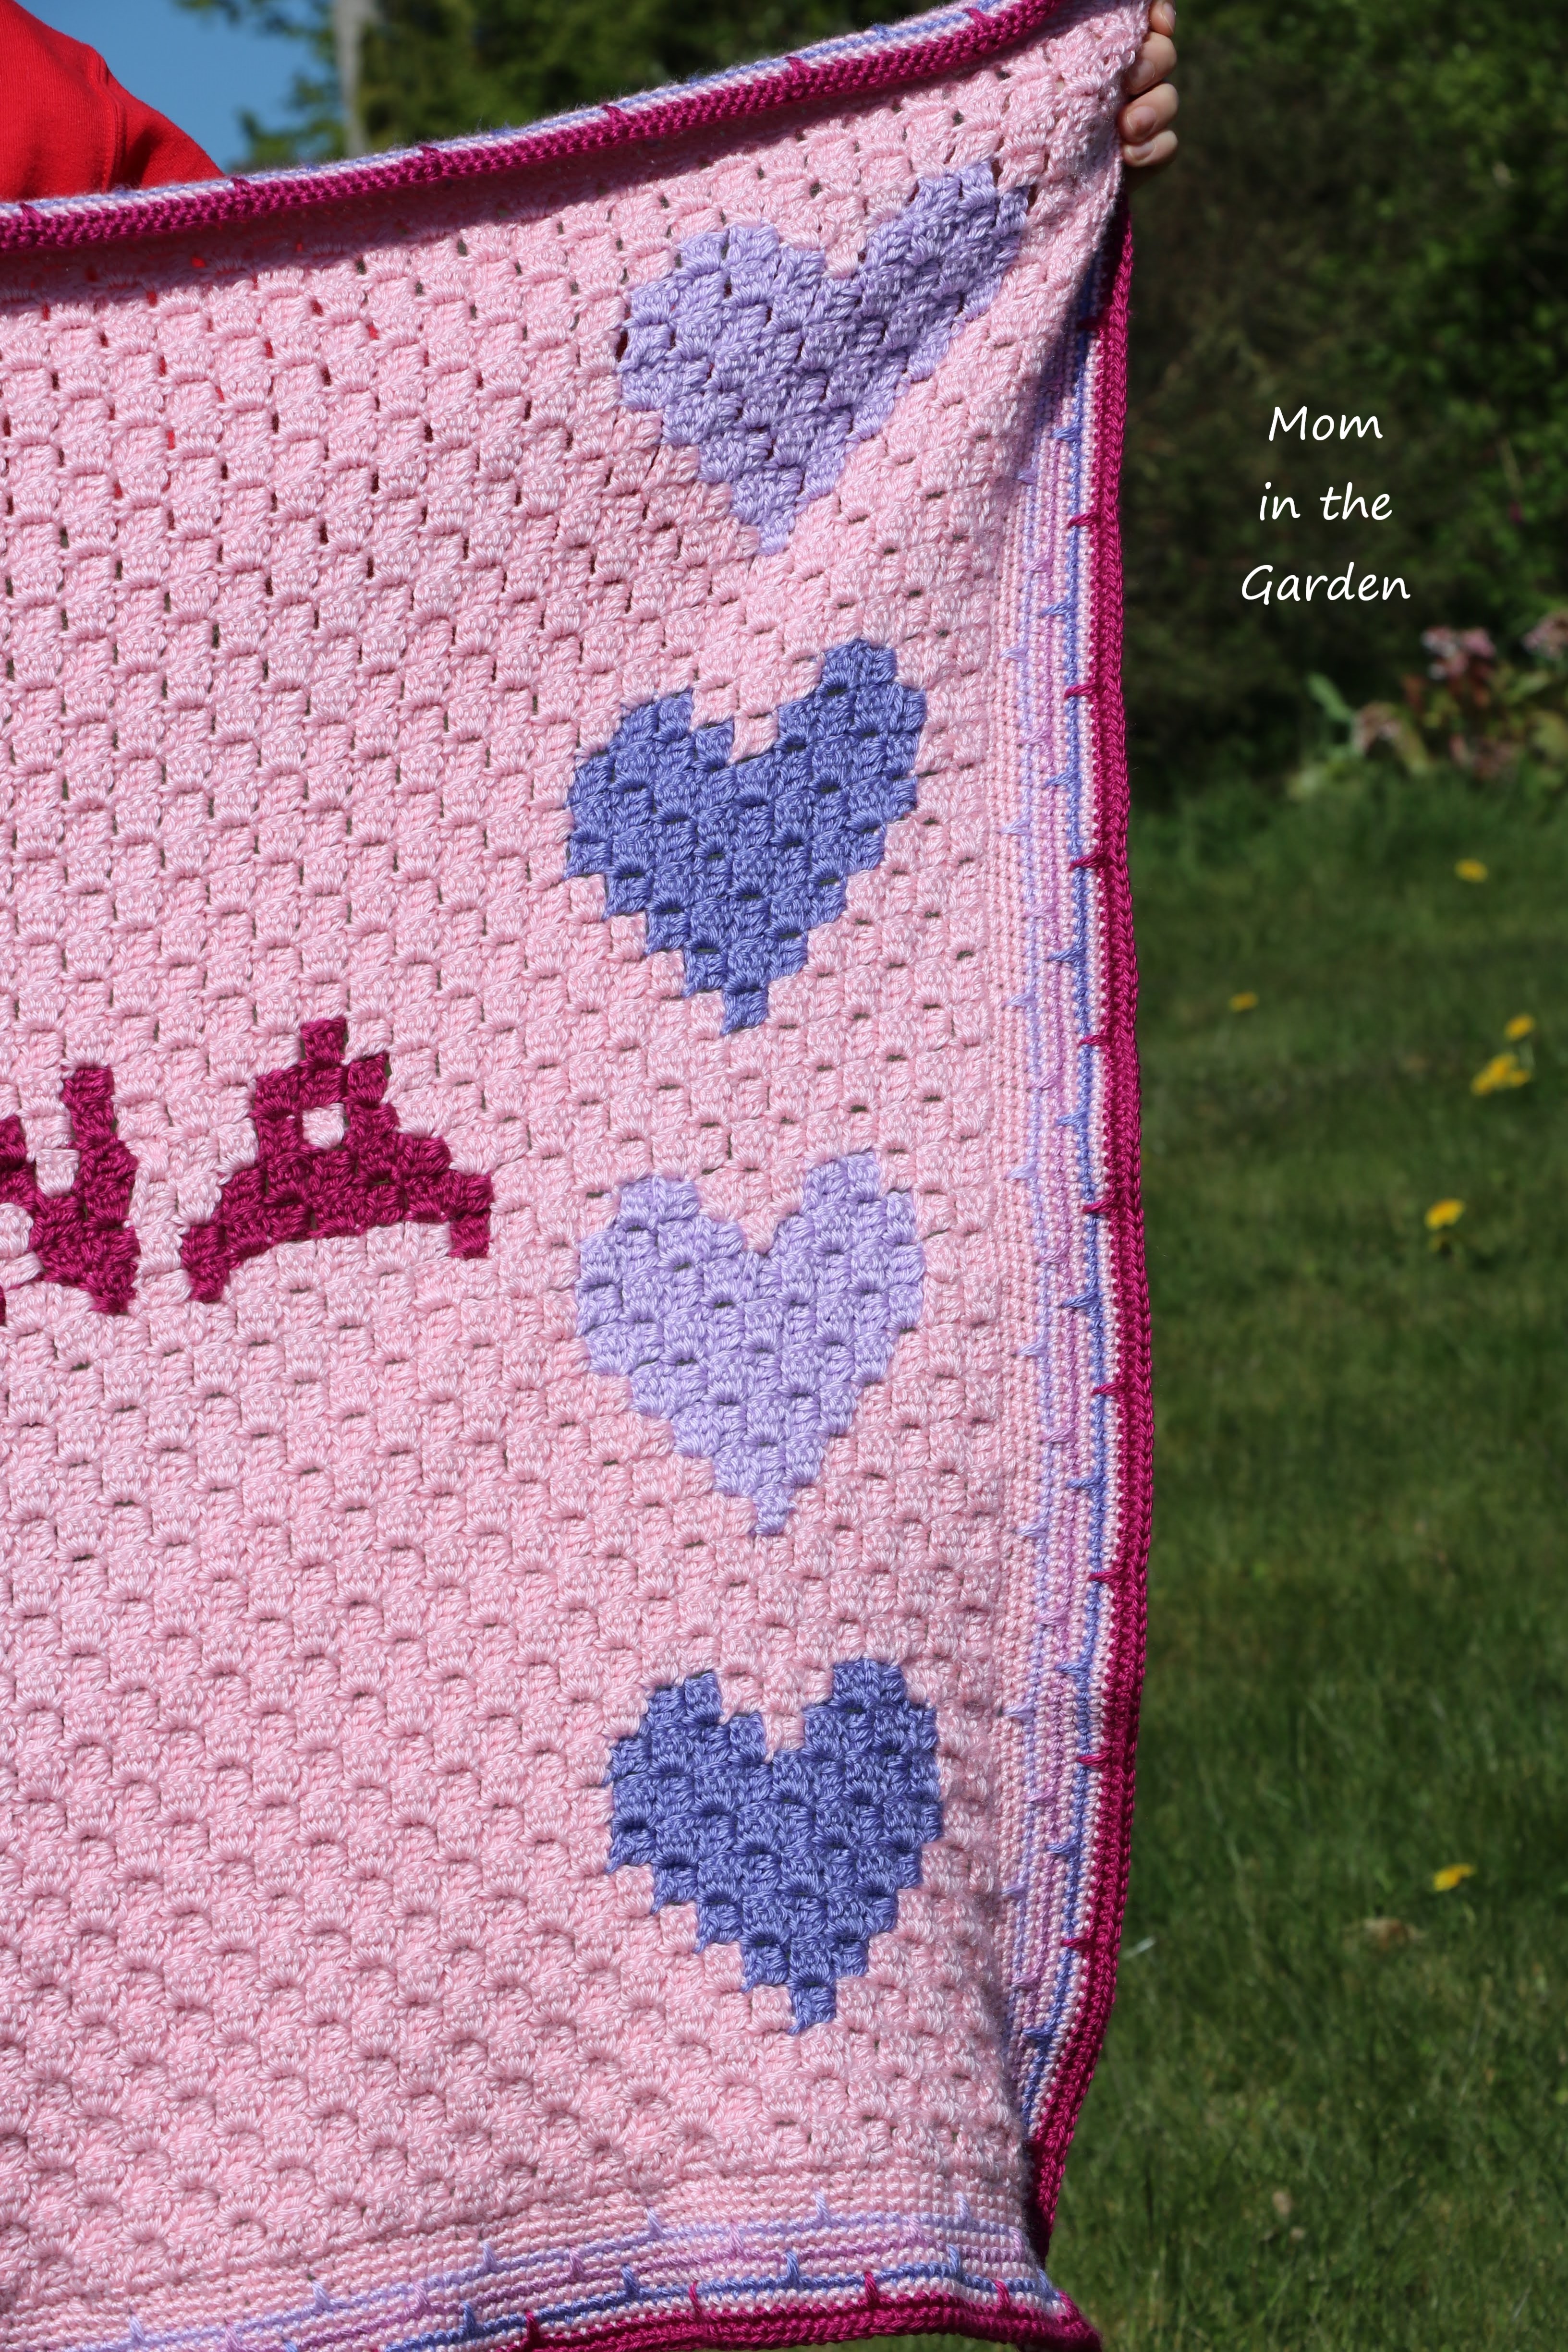
A view of the side hearts and the border
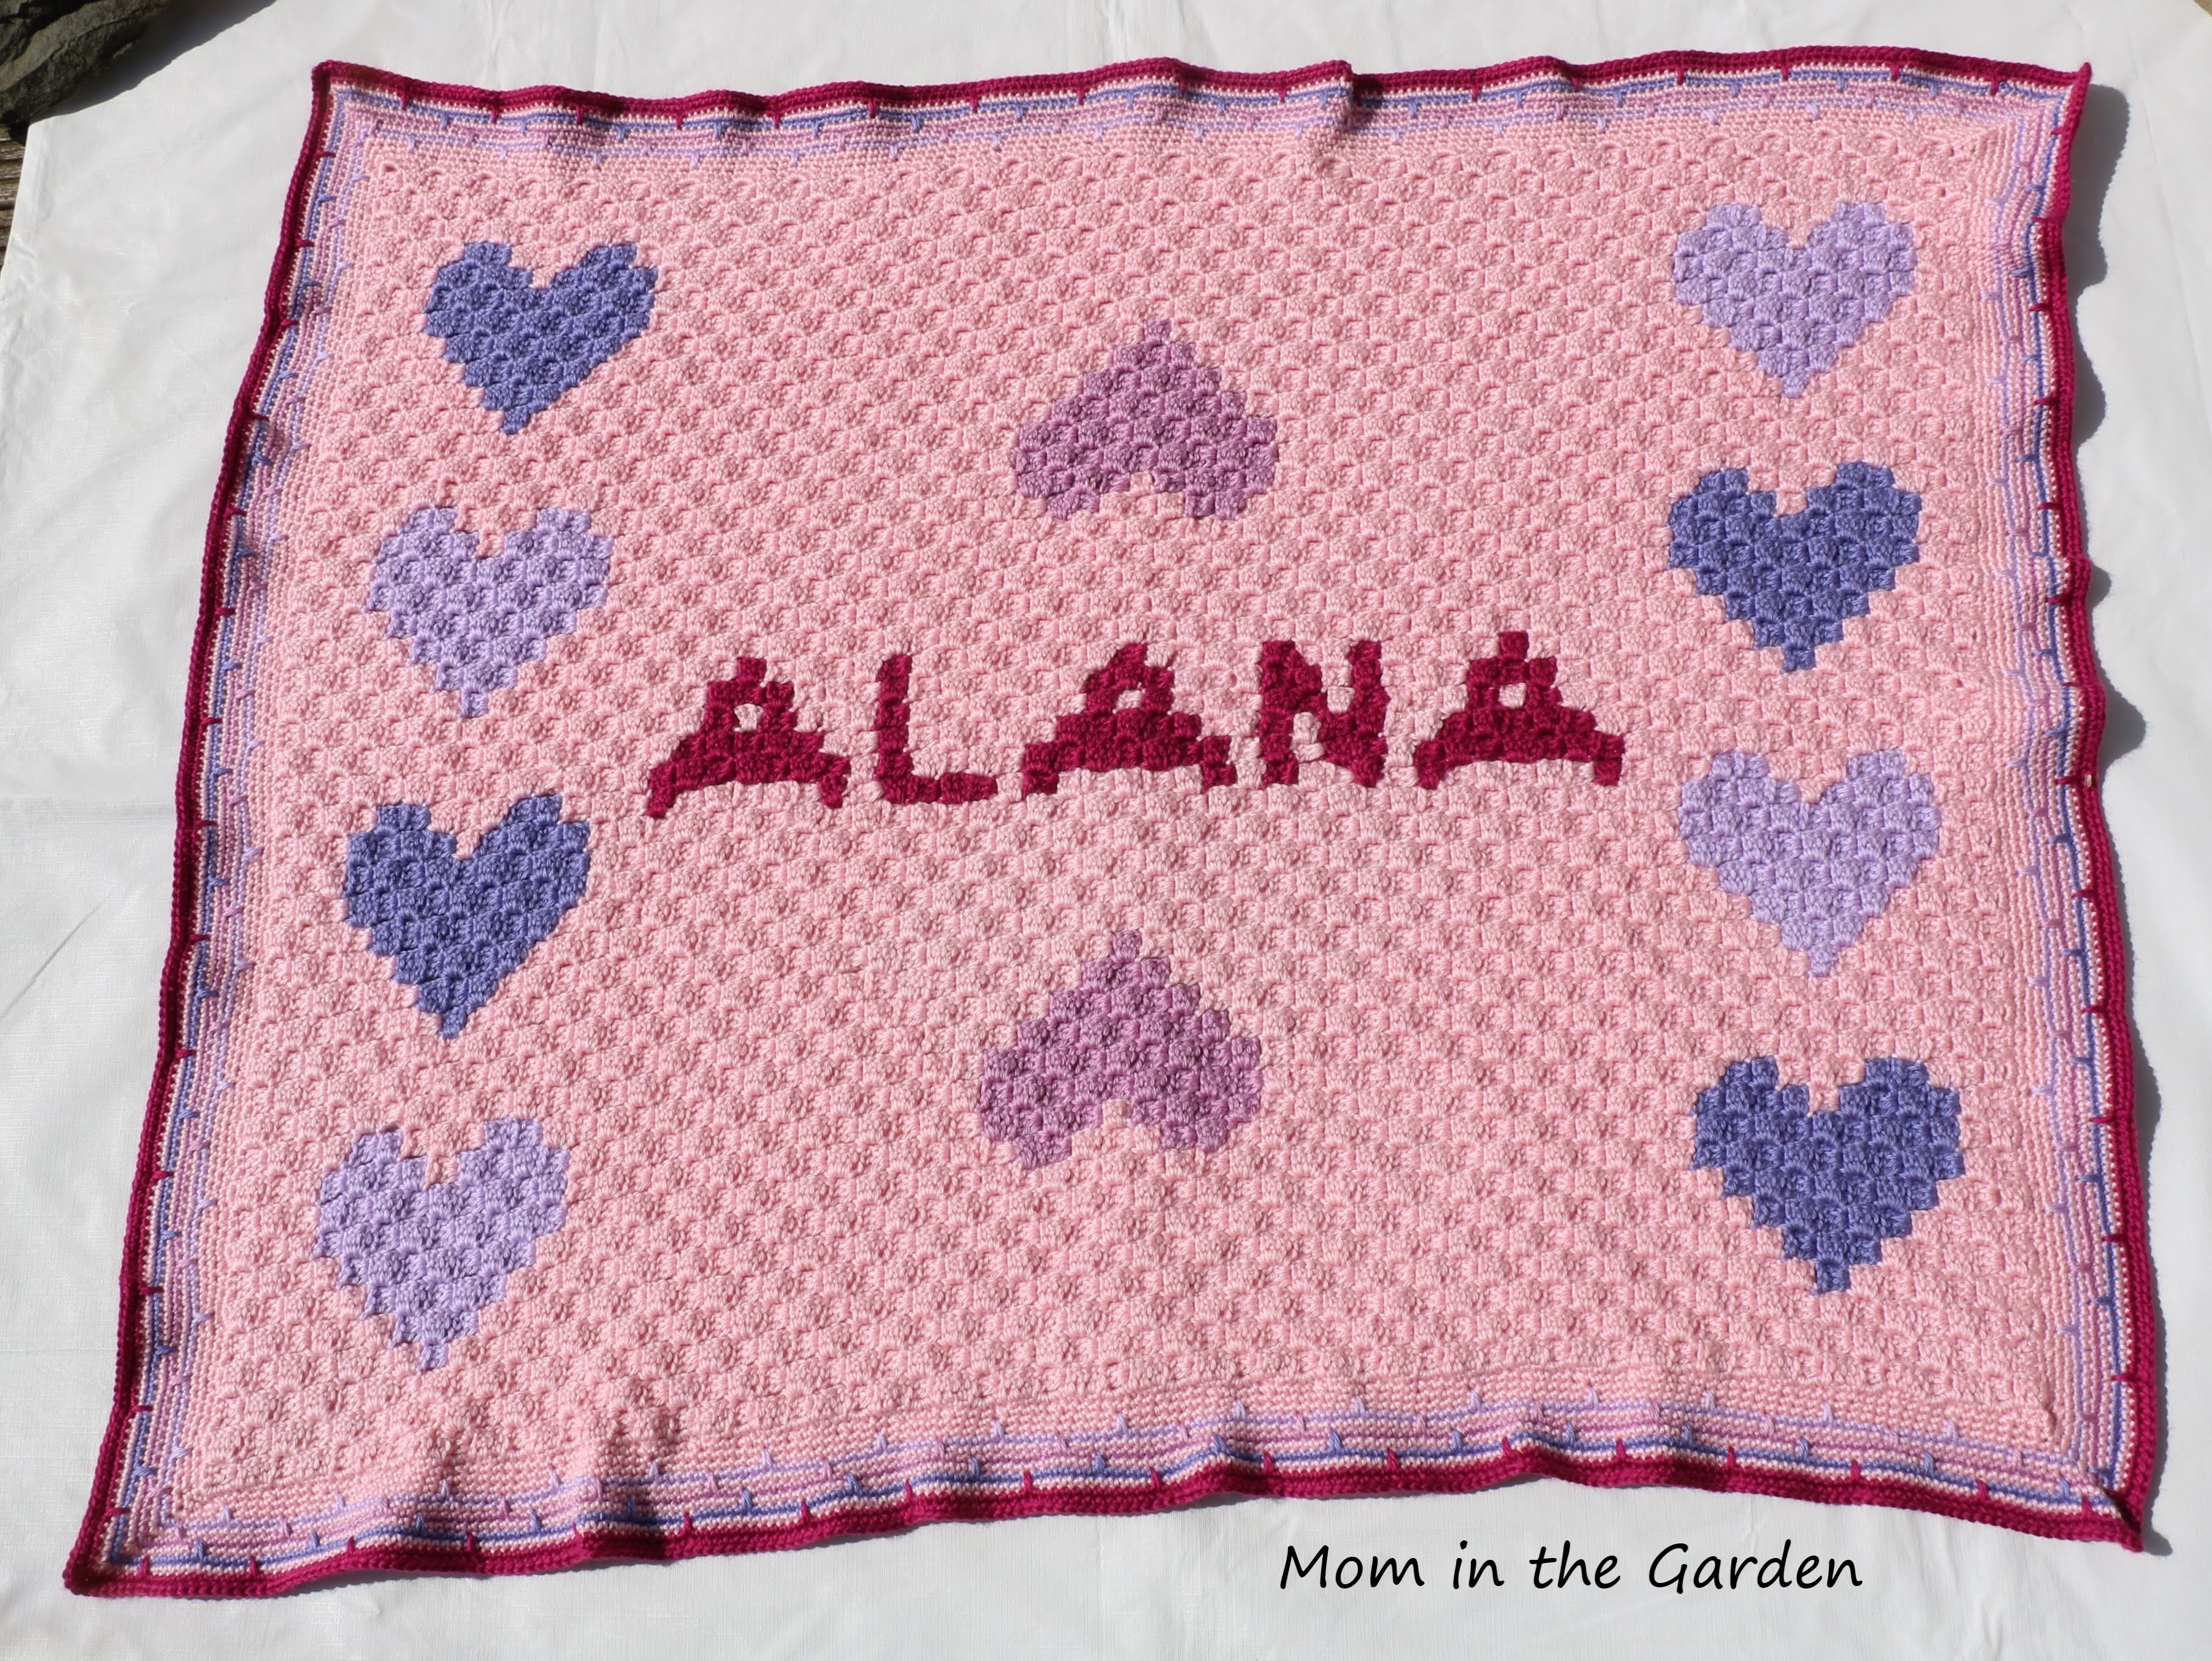
As usual, I used my favorite yarn which is Caron Simply Soft, in soft pink, orchid, lavender, blackberry and fuchsia. I just love the colors and I thought they all went so well with the soft pink background. The size ended up being 44 inches x 35 inches – not too big and not too small. It just goes to show that it is always worth having lots of stock of different colors in the house, because you never know when you’ll be in lock-down and unable to buy more yarn! 😉
A view of the side hearts and the border
The border changes with every additional color added
Once I finished the main blanket, I then had to pick a border. I decided on a stitch that is very similar to the border I used on my last blanket (my poppy blanket). I just like that style: a simple single crochet stitch with a spike stitch.
I thought the hearts were just perfect!
I will admit to being one of the slowest crocheters ever! I just don’t go fast. And if I’m crocheting, I’m crocheting, and I’m not multi-tasking. That’s just how I do it. So this blanket took me a month to complete. I really enjoyed watching how it came together with each heart. The center part with the name was tricky. That’s all I’ll say about that!
a closeup of the corner border
A full view of the blanket
I was very happy with the finished blanket! I will definitely use the corner to corner pattern again. I’m not sure what my next project is…but I have a few ideas!
Take care and stay safe!
In Peace,
Dana
My daughter holding up the blanket for me to photograph
Starting with a simple ‘Robin’s egg blue’ base for the blanket
Creating with my hands is one of my favorite things to do. Whether it be crocheting, making wreaths, or whatever, I enjoy crafts that finish with a lovely ‘something’.
A close up of the waistcoat stitch (doesn’t look like crochet to me)
Crocheting is so much more than just granny squares (although there’s nothing wrong with a good granny square!). I made a number of items over the past few years as gifts and I felt the time was right to make something for myself.
close up of the border (variation of the spike stitch)
We’d completely ‘done up’ our family room last year: pulled up the rug, installed an electric fireplace, bought a new couch, curtains, and light fixture, and painted the room. It was a long time in the making and last year everything finally came together. We all love it, especially the couch. It is like getting into a big family bed. 🙂
The main blanket finished but not yet embellished with poppies, held by my lovely daughter. There are orange California poppies in the background of the picture, along with red poppies which are not as easily seen here.
We went a bit bold with the paint in the family room – it is Adonis blue. Happy to say that we really like it. And we went bold again in pairing it with red curtains. So I wanted a blanket that would bring those colors together. Not only that, I wanted to embellish it with poppies, to tie in with the curtains. That was January 2019.
It was a painstaking process figuring out the poppy pattern!
The pistil (in black) and stamen (in bone) give extra texture to the flower.
Some things just take time, and deciding which pattern to use for the main blanket was no exception. I finally decided on a pattern that doesn’t really look like crochet. It is called the waistcoat stitch. I used a tutorial from Crafternoon Treats.
The completed poppy flower looks different depending on whether the petals are laid flat or scrunched up (my preference).
The border is where I worked in the colors of the curtains, using a variation of the spike stitch. I used Caron Simply Soft yarn, in harvest red, bone, black, off white for the border and the main blanket is in Robin’s egg blue. It is a ‘throw’ size, and if you sit nice and close to each other, it will cover two people for watching tv. (4′ x 5.5′)
Playing around with the flowers to figure out where to place them.
I ran out of the blue about half way through, but I had a trip to the States coming up, so I restocked (phew!). I finally finished the main blanket in June.
Completed blanket with poppies (winter sunlight distorts the coloring).
Finding a pattern that I liked for the poppies was a whole other challenge! Finally, I found one that had the stamen and pistil, with the bonus of texture for the pistil, and four individual petals. I really like it. I found it on crochet-ideas.com. The video is in Italian, but with subtitles, so although tricky, it was manageable.
Our family room transformed!
It took some time figuring out how I wanted the poppies to look on the blanket. They couldn’t be symmetrical – anyone who’s grown poppies will know that they grow all over the place, and never where you plan them! I also didn’t want to cover the blanket in them, as I quite like the blue and wanted to be able to see it. So they are in a bit of a cascade from one corner to the opposite corner. Voilà!
Me with my blanket 🙂
I am absolutely delighted with it, and thankfully the family like it too. I’m glad I took my time with it to find the right patterns. And I think it fits in perfectly in our family room.
Hi there! We were away at my daughter’s Irish dancing competition last weekend, which meant I had lots of “free time” before and after her competitions. Now that my daughter is 14 and does all of her prep work herself, the free time was really all mine (and better for my daughter’s stress levels when I keep myself busy!). I took full advantage of that time and started a new crochet project.
In the beginning… starting at the neck.
This project was actually a long time in the making. The yarn, called “Caron Cakes” in the color palette Rainbow Sprinkles, was bought for me by my husband about two years ago when he was in the U.S.A. on a business trip (isn’t that nice?!). He thought I’d like the colors, which was 100% correct as I LOVE the colors!
watching the colors unfold
My problem was that I didn’t know what to make with these colors, and I only had two skeins (balls) of yarn. A poncho seemed the best choice, and I began my Pinterest search of patterns. Lots and Lots and Lots of patterns!
Kitty was convinced I needed her support while crocheting.
Eventually, I found the poncho which I thought would be perfect. The pattern I finally picked is called Mountain Breeze Poncho and was designed by Lorene Eppolite. It is a free pattern (I love those)! I would still consider myself a novice when it comes to reading patterns, so it took me a few go’s to get it right in the beginning. But once I figured it out, it was rather easy.
Mid-way progress picture!
It is meant to sit slightly off of the shoulders, which seems a bit unusual, but I think it works well. The front “pointy” part and the back “pointy” part are actually different. The front has a pattern of raised lines, whereas the back does not. A bit quirky. 🙂
Here is a look at the back while still in progress.
The yarn is soft and I enjoyed working with it, and the poncho itself has a lovely feel. I used a 7 mm crochet hook which is HUGE compared to what I usually use. That took some getting used to! I’m not able to whip through projects, as my hands tend to cramp up (I hold the yarn too tightly!). But this poncho came together quite quickly.
The finished Mountain Breeze poncho in Caron Cakes ‘rainbow sprinkles’
I fiddled a bit with the neck. The pattern had a more open neck, and I preferred a more closed neck. I won. 🙂
A back view of the completed poncho.
I also added on a bit to the outside edging, as I wanted a more defined look. I think I can still wear it with the raised line pattern a bit more on my shoulder, I’ll have to play around with that look!
Completed Mountain Breeze Poncho in Caron Cakes ‘Rainbow Sprinkles’
I loved that this was a quick and relatively easy project, and that I was able to use these fabulous colors! Back to last weekend’s dancing: My daughter danced beautifully at her competition. It was a big competition, and she didn’t place as well as she’d hoped, which is tough. But she’s resilient, and is determined to work harder.
My daughter and I at her Irish dancing competition
There is a funny story that happened over that weekend when we were away for the dancing. A woman who was sitting next to me, looked at me and my crocheting and said “You don’t like free time, do you?”! I laughed and replied that this was my free time and I loved it! I guess it all depends on your perspective.
What do you do in your “me time”?
In peace,
Dana
And this is me, kneeling at my yarnbombed (sewer) pipe in the garden. I just like adding a bit of color to life!
crochet butterfly blanket (with our apple tree and cherry tree in the background)
This sounds a bit of a cliché, but creating a special, unique and personal gift is something that I love to do. There is a young special person in our lives, and I wanted to make her a gift which she would know was made just for her. Although the “perfect” idea did not come to me easily, and I did a lot of searching on-line, I think in the end that I found exactly what I was looking for. 🙂
This is my crochet “butterfly blanket”! The butterflies are crocheted and are part of the blanket (not appliqué). But I discovered that although the butterflies were so cute when I made them, the wings were curling up and then they just looked like bunches of yarn. Perhaps if I blocked them they would stay in place, but instead of doing that, I decided they would look nice embellished with sequins and beads.
the details
Yes, sequins and beads … on every. single. butterfly. … and there are fifty-five butterflies! I have to admit though, that I really enjoyed this part. I mixed and matched colors and somehow it all came together in a fun way.
more details
As for the colors, lavender, light pink and light blue are the favorite colors of our special little person. Those colors were the main focus of the blanket, with yellow and raspberry thrown in to add that splash of color. I used my favorite yarn, which is Caron simply soft. They have an amazing range of colors!
my daughter was kind enough to model the full view of the blanket for me
I have to admit that although I used a pattern to create the butterflies, there is no “overall” pattern. (You can see the free on-line MyPicot butterfly pattern here.) If I were to make this one again, I would definitely do more “before we start” planning. The complete randomness of the butterflies is O.K. by me, but for my daughter who is mathematically minded, it is very unsettling!
a relaxed look
Borders of blankets can be tricky. I played around with this aspect of the blanket, too. I used the “bangles” pattern from Nicky Epstein’s “Crocheting on the edge” book. The blanket took on completely different looks with each round of color that I added! But when I completed the blue round, I felt it looked complete. Phew! I finished it the day before our special someone’s First Holy Communion!
our little special someone is all smiles with her special blanket!
Thankfully, she smiled when she opened her gift. (double phew!!)
That’s three blankets in over eight months (I’m a slow crocheter), so now it is time for me to take a tiny break – at least from making blankets!
You will now find me in the garden on a more regular basis 🙂
Isn’t it wonderful how children’s story books are able to teach life lessons in such a fun way? A favorite book of my family is Elmer by David McKee. The copyright is 1968, and the story still holds its worth today. It is the tale of a patchwork colored elephant who doesn’t like being different than all of the other elephants. He tries to change by acting and looking like everyone else, but he learns along the way that everyone loves him for who he is, and that it is always best to be yourself. Such a simple, touching story.
19 of the 21 colors used in the blanket (navy and cream are missing)
I wanted to make a special blanket for my daughter’s 18th birthday, for her to take to college next year. We had been looking at lots of different styles together, but once we had the idea for an Elmer blanket, that was it, the decision was made. I took out our copy of the book and kept it nearby, for nostalgic reasons. It surprises me how even still, every stage of parenthood is such a gift. I could write so many things to describe how wonderful my daughter is, and how much we love her. I won’t do that, though! 🙂 I will simply share that she is someone who has always been comfortable being herself.
having fun with granny squares
So this is the story of my creating our own Elmer blanket. I was lucky to have LOADS of colors to use (21 different colors, actually). I have no idea where I had all of that yarn stashed (read: hidden)! I’ve learned from previous projects that it is best to use the same type of yarn throughout a project. My yarn of choice here was Caron Simply Soft.
the pattern is that there isn’t a pattern
The crochet squares are five rounds, which is somewhat large, but a very simple pattern. The center of the square is comprised of a pattern of 4 double crochet to 3 chain stitches, with each round after that increasing by 4, the final row having 20 double crochet to 3 chain stitches. There are 150 squares, which comfortably covers a single bed. I crocheted them together using a technique that doesn’t show the stitches on the front. I’d never done this before, so the Little Tin Bird’s tutorial was quite helpful.
The ears and tail are “free moving”!
I used gray as the first border color to connect it to our elephant story. Although Elmer would have been patchwork, I crocheted two gray elephants for two corners, again to connect it to our story. The elephant pattern was fantastically easy, as written by Repeat Crafter Me. The purple border is because my daughter’s favorite color is purple.
a look at the blanket pre-fringe border
The final piece of the blanket is the ball fringe. I wanted this blanket to be extra special so I went through many, many crochet books, and online sites, looking for the perfect finish.
creating and stuffing the balls
a bit of an operation going on…
I wasn’t sure about the “balls”, and the first one I made was too big. But with a little tweaking, I figured out a size my daughter would be happy with. We also decided not to have them at the top/bottom as they might get in the way with sleeping! There are 80 balls, 40 on each length of the blanket. The ball fringe pattern can be found in Nicky Epstein’s “Crocheting on the Edge” book.
my favorite view of the fringe
What an amazing experience it was making this blanket. I loved working with all of those gorgeous colors! The balls were new to me, and fun and easy to make. Best of all, my daughter loved it start to finish (I consulted with her all along the way). It was truly a labor of love!
Emer with her Elmer blanket (and her sister kindly helping to hold it up!)
my daughter is happy with her new blanket
Sweet dreams
We could all use a reminder of Elmer’s lesson now and again – it is always best to be yourself!
When it comes to knitting, sewing, and crocheting, my husband’s family are super talented. We benefitted from that when our babies were born all those years ago, as we didn’t just receive beautiful blankets, but lovely sweaters, too.
Both my husband and son’s aran jumpers were hand made by my husband’s Aunt (October 2004 Manlius, New York)
I did very little crocheting during those years. Funny, I don’t really remember having any free time when the kids were young??? 🙂 But over the past few years I’ve managed to pick up my crochet needle again. The thing is, like everything in life, you can’t just do the same thing over and over again. You have to either do things differently, or add a challenge lest boredom sets in!
Check the measurements on the packaging to save yourself the time and stress of measuring out (what should be) perfect squares 😉
This baby blanket project was for a very special baby. Words can’t even describe how welcomed and loved this baby was, even before meeting any of the family! So I wanted to try something new to make this gift extra-special. I decided on making a quilt on one side of the blanket while keeping my traditional crochet on the other side. The main item I wanted for this blanket, though, was the smooth binding that my kids loved to rub along their faces! “How hard could it be to incorporate those three things?” thought she to herself, quite innocently…
a view of the quilted side of the blanket sitting on what was actually my own rocking chair as a child
Well, I have to say that I learned a lot of new things with this project. I won’t give you all of the details, but the first thing was that you need to check the sizing of material when you buy it in cute little packages! The quilting material was huge and I had to cut it into small squares. 🙂
the material is lovely and soft (albeit rather funny prints!)
I also learned to make sure that I have enough material on *both sides* of the blanket when joining. On my first attempt to sew the crochet side to the quilt side I wasn’t able to keep them aligned. I can tell you that only for my husband’s patience and his help taking the binding off, the project just might have been completely changed! {Thank you husband!}
the back of the crochet squares looked kinda neat
This is the part that strains my fingers the most: joining all of the squares together!
After the mess of needing to take the binding off, I needed a new plan. So I added more squares to the quilt and adjusted the size of the crochet blanket. Attaching just the binding to the quilt with the sewing machine was so much easier now! Then I hand sewed the crochet portion onto the blanket. I have to say that I really enjoyed the hand sewing, which I would not have guessed beforehand.
sewing the binding on to the quilted side of the blanket
hand sewing the crochet side onto the quilted side
One day I’d like to improve my sewing skills. For now though, it’ll just be baby steps with projects like this one.
I can’t miss an opportunity to take a picture of a baby blanket on our family antique potty-chair
As for the teeny tiny little granny squares, I thought they were so cute to make! The colors are really fun and cheerful. I used Mango, Sunshine, Robins Egg, Limelight, Soft Pink, and Off-White. The Caron Simply Soft yarn is one of my favorites to work with as it really is so soft and is a really nice weight.
I usually stock up on Caron Simply Soft yarn when I go home to the States 🙂
I love having things from my childhood, like this rocking chair
I really enjoyed making this blanket and trying something new. There were a few things about it along the way that I just wasn’t sure about, but thankfully as time went on it all worked out and I love it! And I think our sweet little one likes it too.